
Published on January 3, 2022 Reading time: 7 min

Using Our Automation SDK with Appium and Sauce Labs

Post category: Products
Evinced, Appium and Sauce Labs help detect accessibility issues

Appium is a popular open source mobile automation tool and has a significant advantage with its approach to automated mobile testing.

Notably, Appium is cross-platform meaning you can test both iOS and Android from the same framework. I think we all can agree that minimizing the number of context switches required in a given day is always better.

How Appium and Evinced work together

With direct support for Appium available from our Automation SDK, your Appium tests can return even more value by pinpointing accessibility issues as well. This goes beyond what the iOS and Android accessibility APIs offer, by heling you find more issues that could be impacting the accessibility of your application. In addition, Evinced uses advanced algorithms to create a single actionable report that is easy to digest. Having had the pleasure of wading through a sea of 20+ reports created based on individual scans, this is a feature I am very excited about.

The one thing missing from our even more powerful testing practice is the ability to test on a wide variety of devices and operating systems. This is crucially important for both the Android and iOS platforms.

For Android, breadth of coverage is extremely important due to the large segmentation in the Android market (Samsung, Google, LG, HTC, OnePlus, Huawei, etc). All these manufacturers take the default Android OS image from Google and make it their own. This creates the need for additional testing to make sure we give the best experience possible to all users. For iOS, you may have noticed that once you upgrade your iOS device it is impossible to roll it back to a previous version. This way, proper testing requires a library of iOS devices on all the versions a potential customer might be using to ensure a great experience.

How Sauce Labs, Appium, and Evinced work together

Fortunately, Sauce Labs, where Appium was born, has a comprehensive cloud based device pool where we can execute our Appium tests with the Evinced Engine to pinpoint accessibility issues on nearly any device and operating system combination.

In this post, we will discuss how to take an existing Appium test running on a Sauce Labs device and add the Evinced engine to scan for accessibility issues.

Let’s take a look at our Java JUnit Appium test running on a Sauce Labs Device:

import com.evinced.a11y.validator.appium.java.core.A11yValidatorOptions;
import com.evinced.a11y.validator.appium.java.core.EvincedA11yValidator;
import com.evinced.a11y.validator.appium.java.core.Report;
import io.appium.java_client.MobileBy;
import io.appium.java_client.ios.IOSDriver;
import io.appium.java_client.ios.IOSElement;
import io.appium.java_client.remote.MobileCapabilityType;

import java.io.File;
import java.io.IOException;
import java.net.MalformedURLException;
import java.net.URL;
import java.util.List;

import org.openqa.selenium.remote.DesiredCapabilities;
import org.junit.AfterClass;
import org.junit.BeforeClass;
import org.junit.Test;
import org.openqa.selenium.support.ui.ExpectedConditions;
import org.openqa.selenium.support.ui.WebDriverWait;

public class EvincedA11yValidatorTest {

    public static URL url;
    public static DesiredCapabilities capabilities;
    public static IOSDriver<IOSElement> driver;
    public static String sauce_username = System.getenv("SAUCE_USERNAME");
    public static String sauce_accesskey = System.getenv("SAUCE_ACCESS_KEY");
    
    @BeforeClass
    public static void setupAppiumDriver() throws MalformedURLException, IOException {
        URL sauceUrl = new URL("https://" + sauce_username +":" + sauce_accesskey + "@ondemand.us-west-1.saucelabs.com:443/wd/hub");
        capabilities.setCapability(MobileCapabilityType.DEVICE_NAME, "iPhone 12.*");
        capabilities.setCapability(MobileCapabilityType.PLATFORM_NAME, "iOS");
        capabilities.setCapability(MobileCapabilityType.PLATFORM_VERSION, "14.7");
        capabilities.setCapability(MobileCapabilityType.APP, "storage:b7ae6573-cab1-44a5-9b59-343f974376c3");
        
        driver = new IOSDriver<IOSElement>(sauceUrl, capabilities);
        driver.manage().timeouts().implicitlyWait(20, TimeUnit.SECONDS);
    }
    
    @AfterClass
    public static void tearDown() {
        driver.quit();
    }
    
    @Test
    public void testStationsScreenIsAccessible() {
        IOSElement firstStationTableCell = driver.findElement(MobileBy.className("StationTableViewCell"));
        firstStationTableCell.click();
        IOSElement playButton = driver.findElement(MobileBy.className("XCUIElementTypeButton"));
        playButton.click();
        Assert.assertTrue(!playButton.isDisplayed());
    }
}

The first place we want to take a look at is the @BeforeClass method.

This is where we will want to initiate the EvincedAppiumSdk class by passing in the IOSDriver instance that has created an Appium session on the Sauce Labs device cloud. This will not impact any of the existing functionality of the driver, it will simply add the tools needed to add accessibility scans to our test. Check out the Sauce Labs platform configurator for all the information needed to select a cloud device.

Next, add your Evinced service ID and API key to authenticate the Appium SDK. (These credentials can be found by logging into your Evinced account.)

@BeforeClass
public static void setupAppiumDriver() throws MalformedURLException, IOException {
    URL sauceUrl = new URL("https://" + sauce_username +":" + sauce_accesskey + "@ondemand.us-west-1.saucelabs.com:443/wd/hub");
    capabilities.setCapability(MobileCapabilityType.DEVICE_NAME, "iPhone 12.*");
    capabilities.setCapability(MobileCapabilityType.PLATFORM_NAME, "iOS");
    capabilities.setCapability(MobileCapabilityType.PLATFORM_VERSION, "14.7");
    capabilities.setCapability(MobileCapabilityType.APP, "storage:b7ae6573-cab1-44a5-9b59-343f974376c3");
    
    driver = new IOSDriver<IOSElement>(sauceUrl, capabilities);
    driver.manage().timeouts().implicitlyWait(20, TimeUnit.SECONDS);
    // Init the EvincedAppiumSdk
    evincedSdk = new EvincedAppiumSdk(driver);
    evincedSdk.setupCredentials("<Evinced Service ID>","<Evinced API Key>");
}

Now that we have added the capabilities need to the driver, the next step is to identify in our test where adding accessibility scans will give use the maximum coverage of our application. This will likely be after a tap or a swipe that takes us to a new page or opens a menu. Taking a look at our test we can identify the following points:

@Test
public void testStationsScreenIsAccessible() {
    // The main application screen has loaded. Let's scan for a11y issues!
    IOSElement firstStationTableCell = driver.findElement(MobileBy.className("StationTableViewCell"));
    firstStationTableCell.click();
    // We have clicked on a cell that has taken us to a new page. Let's scan for a11y issues!
    IOSElement playButton = driver.findElement(MobileBy.className("XCUIElementTypeButton"));
    playButton.click();
    // We have now entered the player view. Let's scan for a11y issues!
    Assert.assertTrue(!playButton.isDisplayed());
}

Now that we have identified the points in our test that would be good to scan, lets add the code:

@Test
public void testStationsScreenIsAccessible() {
    // Let's scan for a11y issues!
    evincedAppiumSdk.analyze();
    IOSElement firstStationTableCell = driver.findElement(MobileBy.className("StationTableViewCell"));
    firstStationTableCell.click();
    // Let's scan for a11y issues!
    evincedAppiumSdk.analyze();
    IOSElement playButton = driver.findElement(MobileBy.className("XCUIElementTypeButton"));
    playButton.click();
    // Let's scan for a11y issues!
    evincedAppiumSdk.analyze();
    Assert.assertTrue(!playButton.isDisplayed());
}

In this test we have added the scans directly to test code for demonstration purposes. For actual implementation we would recommend adding the scans to existing page objects methods to make maintenance simple and easy.

The last thing we need to do is generate the report of all the scans. We can do that in the @AfterClass method.

@AfterClass
public static void tearDown() {
    List<Report> reports = evincedSdk.reportStored(true);
    driver.quit();
}

This single line of code will automatically compile all of the data from the scans and generate a set easy to digest HTML and JSON report files.

We are now ready to execute our test!
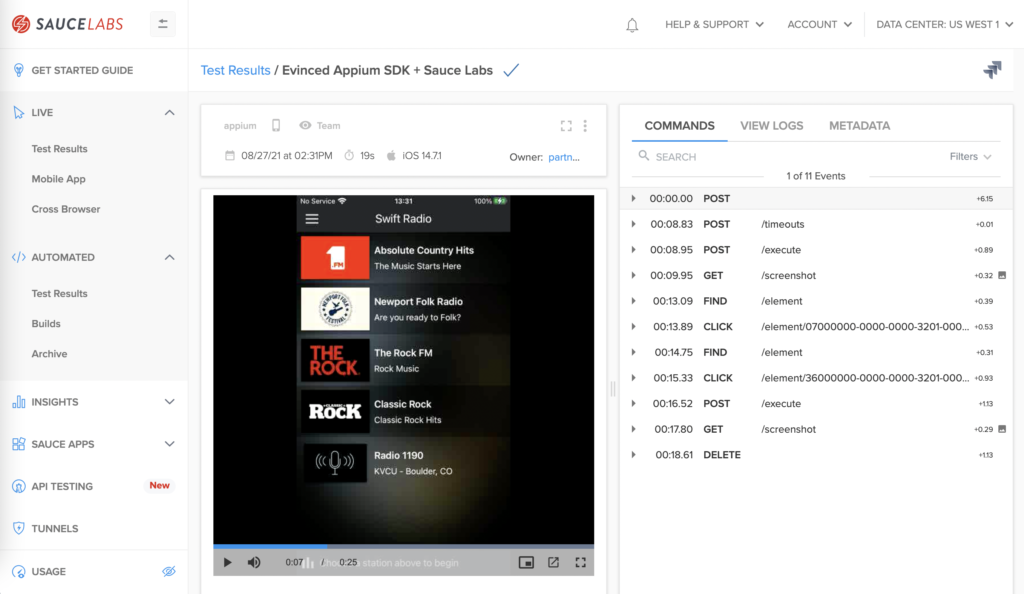
The Sauce Labs dashboard showing the Swift Radio app displayed on an iOS device. Commands, Logs, Metadata, options available.

Not only can we run our test on any of the hundreds of devices and operating system versions Sauce Labs provides, we also gain the additional insights provided such as videos, logs, and screenshots to make debugging our functional test quicker and easier.

This is extremely powerful combined with the actionable Evinced HTML and/or JSON accessibility report containing all issues found, severity levels, descriptions, effect on end users, and a link to actionable information on how to resolve the issues.
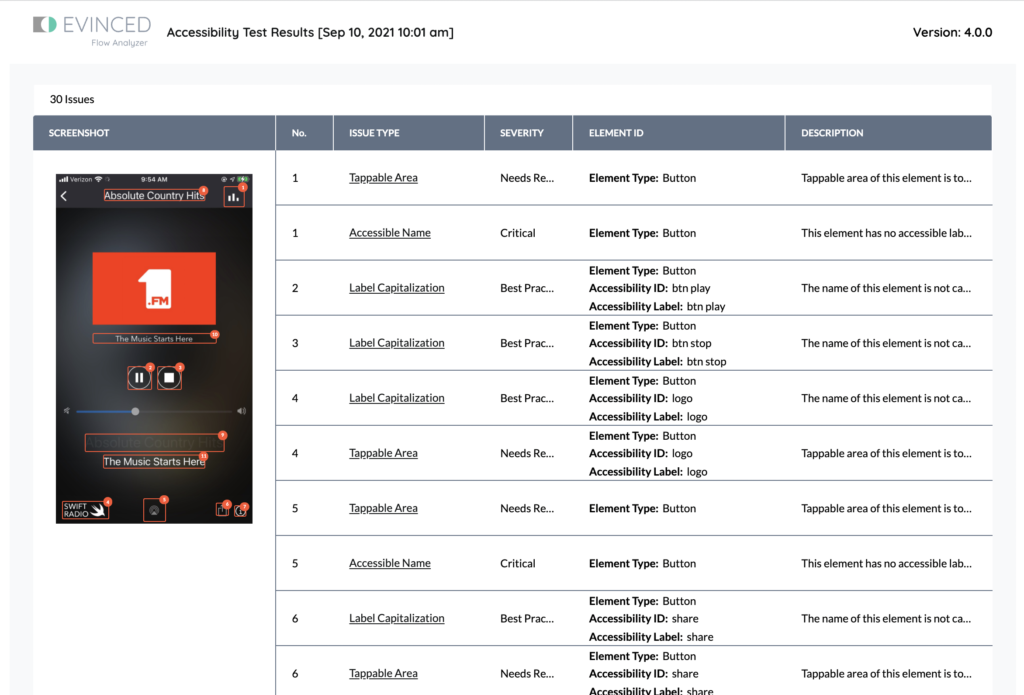
Evinced html report that includes a highlighted screenshot, issue type, severity, element ID, and description.

Check out the Evinced and Sauce Labs pages for more information on getting started!

Published on December 27, 2021 Reading time: 3 min

Evinced Mobile Flow Analyzer and Perfecto

Post category: Products
Evinced and Perfecto's cloud based continuous testing platform.

The Evinced Mobile Flow Analyzer is a free tool that allows you to connect to a mobile device right from your desktop and scan any native mobile applications for accessibility issues.

Actionable reports can be created with a single click to make communicating with developer team members easier than ever.

The Evinced rule set goes beyond what the vendor accessibility APIs offer to help you find more issues that could be impacting the accessibility of your application. In addition, Evinced uses advanced algorithms to create a single actionable report that is easy to digest. Best of all, access to the source code isn’t required! There is no need to rebuild the app or modify it in any way to test it for accessibility issues.

The one thing missing from this powerful tool is access to a wide variety of devices and operating systems. This is crucially important for both the Android and iOS platforms.

For Android, breadth of coverage is extremely important due to the large segmentation in the Android market (Samsung, Google, LG, HTC, OnePlus, Huawei, etc). All these manufacturers take the default Android OS image from Google and make it their own. This creates the need for additional testing to make sure we give the best experience possible to all users. For iOS, you may have noticed that once you upgrade your iOS device it is impossible to roll it back to a previous version. This way, proper testing requires a library of iOS devices on all the versions a potential customer might be using to ensure a great experience.

Fortunately, Perfecto has a comprehensive cloud based continuous testing platform where we can scan our app for accessibility issues on nearly any device and operating system combination. In this blog we will walk through how easy it is to connect to an iOS device in the Perfecto cloud from the Evinced Mobile Flow Analyzer desktop client.

Perfecto makes this process very easy with their DevTunnel feature. Here is description from the Perfecto documentation page:

With Perfecto DevTunnel, developers can leverage real devices in the Perfecto Smart Lab, a cloud-based test lab, as if they were connected locally to their workstation over a USB cable. At the same time, developers can fully control the device environment to perform development and debugging activities.

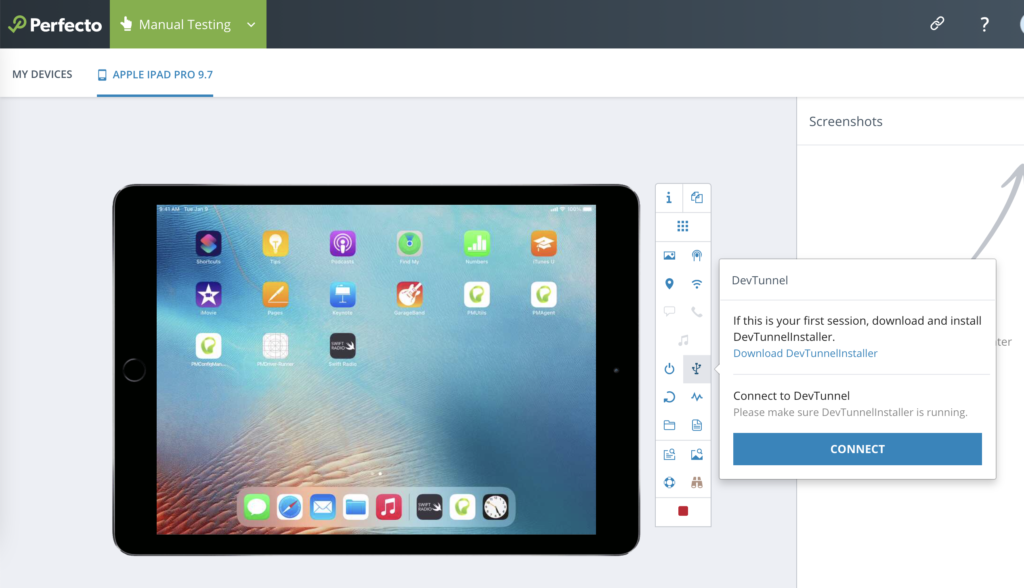
To get started, launch a manual testing session from the Perfecto UI. On the side panel you will notice the DevTunnel option. If this is the first time you are making this type of connection, download the installer and follow the instructions. Perfecto has a great video walking through the installation steps. Then, click connect.

Perfecto's cloud based continuous testing platform. Here we have the Perfecto UI with an iPad open for manual testing. The DevTunnel menu is open with options to download the DevTunnelInstaller or Connect.

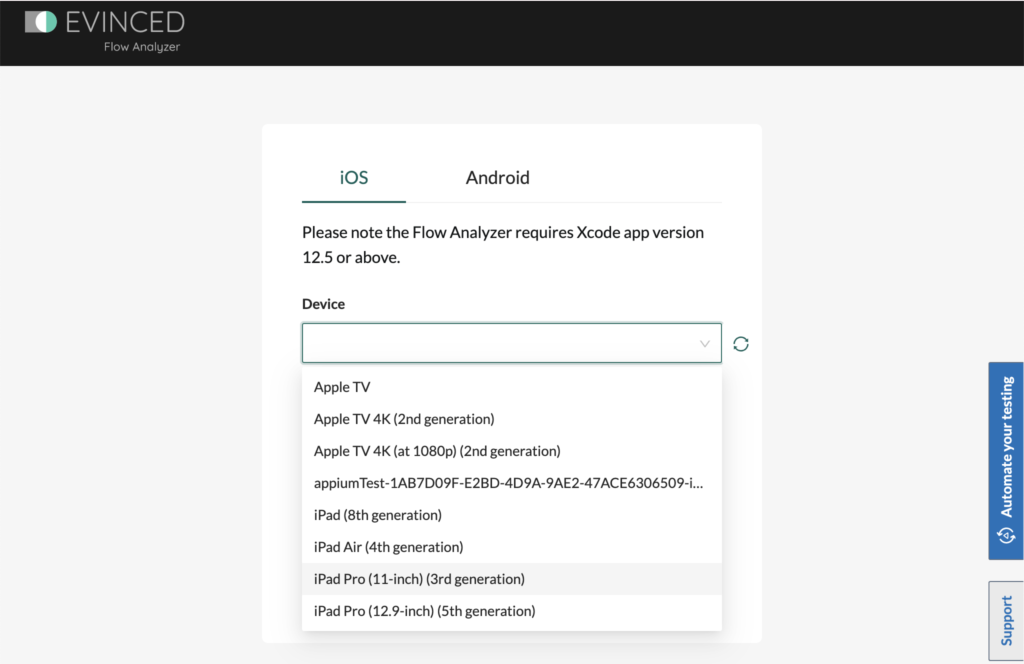
Once the DevTunnel connection is established we can then move to the Evinced Mobile Flow Analyzer UI. You can download the desktop client for Mac or Windows and then login. Select iOS and then we can choose our device from the dropdown.

The Evinced Flow Analyzer for Mobile iOS connection page with the device selection dropdown showing a list of iOS devices and simulators.

Select the Perfecto device, enter your Apple Developer Team ID and click connect. Thats it! We are now ready to start scanning our app for accessibility issues on any of the thousands of devices that are available from Perfecto.

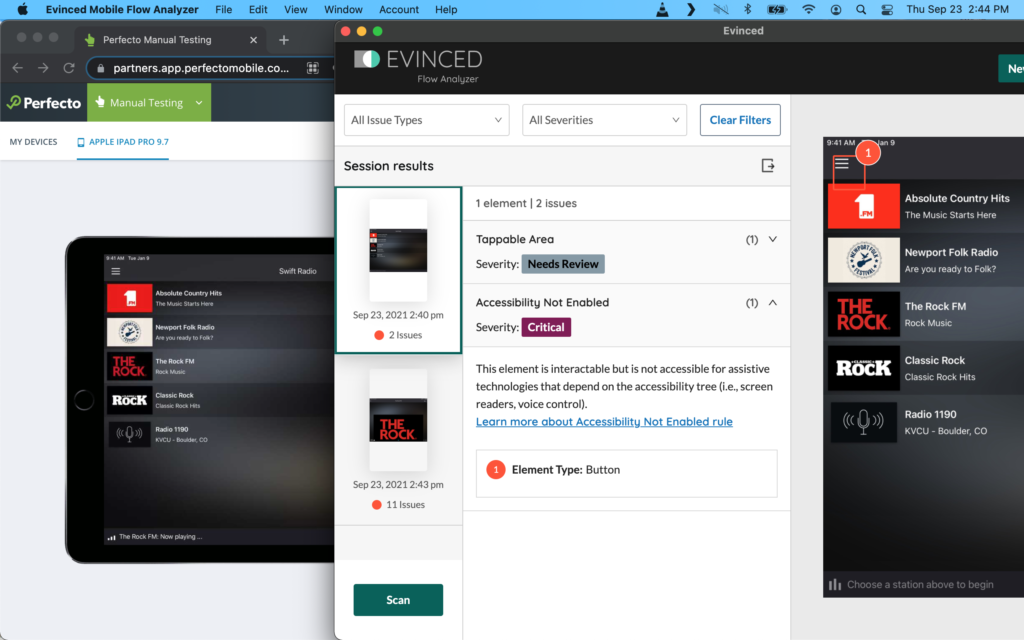
The Perfecto UI and the Evinced desktop client showing an accessibility scan from an app launched on the Perfecto device. There is a Tappable Area violation and Accessibility Not Enabled violation.

Check out the Evinced and Perfecto pages for more information on getting started!

Published on December 21, 2021 Reading time: 9 min

Selenium and our Automation SDK

Post category: Products
automatically detect accessibility issues with Evinced and Selenium

With the speed of modern release cycles, reliance on manual processes at any point of the development pipeline has a significant impact on developer productivity and release velocity.

Functional testing has made this shift in the past decade but unfortunately accessibility testing is still heavily reliant on manual audits and reviews. There are a few legacy open source tools available for automated accessibility testing, however they are not built in a way that suits modern teams that may need to release dozens of times per day.

In this post, I will discuss advantages of our Automation SDK for Selenium and how Evinced solves the problems created for modern development teams by legacy open source accessibility automation tools.

The problems

There are a few reasons why the adoption of these legacy tools often fail:

Individual test code requires significant modification

A retail website may have an investment of well over 1000 Selenium tests to ensure it is functioning as expected. Not all of these tests will need to have accessibility scans added to them, but a significant subset will be needed to ensure all areas of the website are covered. To many developers, adding accessibility coverage to all those tests just doesn’t look to be worth the effort.

Maintenance

Each time the functionality of the site changes, the accessibility scans will also have to be changed so they continue to add value to the tests.

Managing Results

The results traditional tools provide are not consolidated and easy to digest. A single test might return multiple reports that then need to be deduplicated, archived, and reviewed in order to prioritize and fix the issues.

The Evinced approach

Evinced has a new approach built for high velocity development teams with a modern release cadence.

Our Automation SDK integrates with Selenium tests to automatically detect accessibility issues using computer vision and advanced algorithms. With the addition of just a few lines of code to your Selenium framework you can begin to analyze all the pages and DOM changes to offer a dynamic view of how your site can become more accessible.

At the conclusion of the test, a rich and comprehensive JSON or HTML report is generated to track issues in any reporting tool.

Legacy tool implementation

Legacy accessibility tools require a scan to be manually inserted in the code after any action taken within the test that exposes additional page elements or triggers a DOM change. Not only that, after each scan we must check the Result object to see if any issues were detected, and if so, generate the report file.

In the example below, the code example on the left is a simple Selenium test that verifies the functionality of a travel site.

The test navigates to the site, completes a form, clicks a button, and then verifies the form has been submitted and that we have navigated to a new page. On the right, we have the same test with the additional lines of code needed to incorporate accessibility scans to the test.

//imports ...

public class DemoTest {
  public static final String demoPage = "https://demo.evinced.com/";
  private WebDriver driver;

  @BeforeClass
  public void setUp() {
      driver = new ChromeDriver();
  }
  
  @AfterClass
  public void tearDown() {
      driver.quit();
  }
      
  @Test
  public void evincedTrvlTest() {
      // Navigate to the website under test
      driver.get(demoPage);
      // Click "Your New Home" dropdown
      driver.findElement(By.cssSelector("div.filter-container > div:nth-child(1) > div > div.dropdown.line")).click();
      // Click "Where" dropdown
      driver.findElement(By.cssSelector("div.filter-container > div:nth-child(2) > div > div.dropdown.line")).click();
      // Click "When" date picker
      driver.findElement(By.cssSelector(".react-date-picker")).click();
      // Click on the "Search" Button
      driver.findElement(By.className("search-btn")).click();
      // Assert we have navigated to the results page
      Assert.assertEquals("Page two | Evinced, Demos site", driver.getTitle());
  }
}
//imports ...

public class DemoTest {
  public static final String demoPage = "https://demo.evinced.com/";
  private WebDriver driver;

  @BeforeClass
  public void setUp() {
      driver = new ChromeDriver();
  }
  
  @AfterClass
  public void tearDown() {
      driver.quit();
  }

+  public void createReport(Results result) {
+      <Rule> violations = result.getViolations();
+      // If there are violations detected, create a report file
+      if (violations.size() > 0)
+        {
+         AxeReporter.writeResultsToJsonFile("/path/to/result/directory", result);
+        }
+  }
      
  @Test
  public void evincedTrvlTest() {
      // Navigate to the website under test
      driver.get(demoPage);
+      // Scan the current page state for accessibility issues
+      Results result = new AxeBuilder().analyze(driver);
+      // Check for violations and create report
+      createReport(result);
      // Click "Your New Home" dropdown
      driver.findElement(By.cssSelector("div.filter-container > div:nth-child(1) > div > div.dropdown.line")).click();
+      result = new AxeBuilder().analyze(driver);
+      createReport(result); 
      // Click "Where" dropdown
      driver.findElement(By.cssSelector("div.filter-container > div:nth-child(2) > div > div.dropdown.line")).click();
+      result = new AxeBuilder().analyze(driver);
+      createReport(result);
      // Click "When" date picker
      driver.findElement(By.cssSelector(".react-date-picker")).click();
+      result = new AxeBuilder().analyze(driver);
+      createReport(result);
      // Click on the "Search" Button
      driver.findElement(By.className("search-btn")).click();
+      result = new AxeBuilder().analyze(driver);
+      createReport(result);
      // Assert we have navigated to the results page
      Assert.assertEquals("Page two | Evinced, Demos site", driver.getTitle());
  }
}

Adding the scans after every interaction adds a significant amount of complexity to the test case. The code below needs to be added after any action that revealed more of the application or took us to a new page.

// Scan the current page state for accessibility issues
Results result = new AxeBuilder().analyze(driver);
// Check for violations and create report
createReport(result);

Now, I will be first to admit some refactoring could be done to clean things up a bit. Nonetheless, the time required to implement dozens of scans this way, plus the effort needed to maintain the tests going forward, equals a task that many developers simply won’t do.

In addition, within our example test we added 5 accessibility scans in order to cover all of the elements of the site. This means that at the end of this single test we will need to deduplicate and interpret 5 separate report files. A single test class could have 30+ tests leaving us with an arduous task of extracting value from over 100 files. This is a frustrating task especially when considering the amount of effort it takes to implement the legacy tools.

Implementing our Automation SDK for Selenium

Let’s take a look at how Evinced does things differently. Here is our example test with the addition of accessibility scans using our Automation SDK. Again, our original test is on the left for easy comparison.

//imports ...

public class DemoTest {
  public static final String demoPage = "https://demo.evinced.com/";
  private WebDriver driver;

  @BeforeClass
  public void setUp() {
      driver = new ChromeDriver();
  }
  
  @AfterClass
  public void tearDown() {
      driver.quit();
  }
      
  @Test
  public void evincedTrvlTest() {
      // Navigate to the website under test
      driver.get(demoPage);
      // Click "Your New Home" dropdown
      driver.findElement(By.cssSelector("div.filter-container > div:nth-child(1) > div > div.dropdown.line")).click();
      // Click "Where" dropdown
      driver.findElement(By.cssSelector("div.filter-container > div:nth-child(2) > div > div.dropdown.line")).click();
      // Click "When" date picker
      driver.findElement(By.cssSelector(".react-date-picker")).click();
      // Click on the "Search" Button
      driver.findElement(By.className("search-btn")).click();
      // Assert we have navigated to the results page
      Assert.assertEquals("Page two | Evinced, Demos site", driver.getTitle());
  }
}
//imports ...

public class DemoTest {
  public static final String demoPage = "https://demo.evinced.com/";
  private EvincedWebDriver driver;

  @BeforeClass
  public void setUp() {
+      driver = new EvincedWebDriver(new ChromeDriver());
+      // Start the Evinced Engine
+      driver.evStart();
  }
  
  @AfterClass
  public void tearDown() {
+      // Stop the Evinced Engine
+      Report report = driver.evStop();
+      // Output the Accessibility results in JSON or HTML
+      EvincedReporter.writeEvResultsToFile("accessibilityReport", report, EvincedReporter.FileFormat.JSON);
      driver.quit();
  }
      
  @Test
  public void evincedTrvlTest() {
      // Navigate to the website under test
      driver.get(demoPage);
      // Click "Your New Home" dropdown
      driver.findElement(By.cssSelector("div.filter-container > div:nth-child(1) > div > div.dropdown.line")).click();
      // Click "Where" dropdown
      driver.findElement(By.cssSelector("div.filter-container > div:nth-child(2) > div > div.dropdown.line")).click();
      // Click "When" date picker
      driver.findElement(By.cssSelector(".react-date-picker")).click();
      // Click on the "Search" Button
      driver.findElement(By.className("search-btn")).click();
      // Assert we have navigated to the results page
      Assert.assertEquals("Page two | Evinced, Demos site", driver.getTitle());
  }
}

As you can see below, the only setup needed to add accessibility scans to your existing Selenium tests is in the @BeforeClass and @AfterClass methods. There is no need to alter the individual test code in any way.

In the @BeforeClass method we simply need to pass the EvincedWebDriver a Selenium driver instance and call the evStart() method. This starts the Evinced engine which will continuously run in the background tracking all DOM changes and page navigations and collect accessibility violations as the tests execute.

@BeforeClass
public void setUp() {
    driver = new EvincedWebDriver(new ChromeDriver());
    // Start the Evinced Engine
    driver.evStart();
}

The last thing we need to do is stop the engine and generate the accessibility reports. We can do that in the @AfterClass method. A Report object is created when we stop the Evinced engine using the evStop() method. We can then choose to export the accessibility report as a JSON or HTML report (or both!).

@AfterClass
public void tearDown() {
    // Stop the Evinced Engine
    Report report = driver.evStop();
    // Output the Accessibility results in JSON or HTML
    EvincedReporter.writeEvResultsToFile("accessibilityReport", report, EvincedReporter.FileFormat.JSON);
    driver.quit();
}

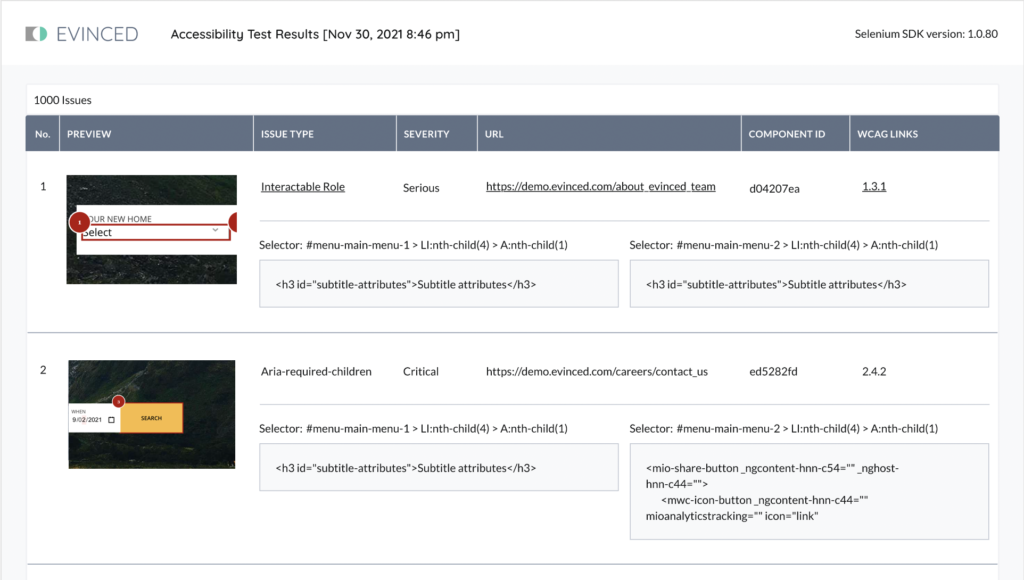
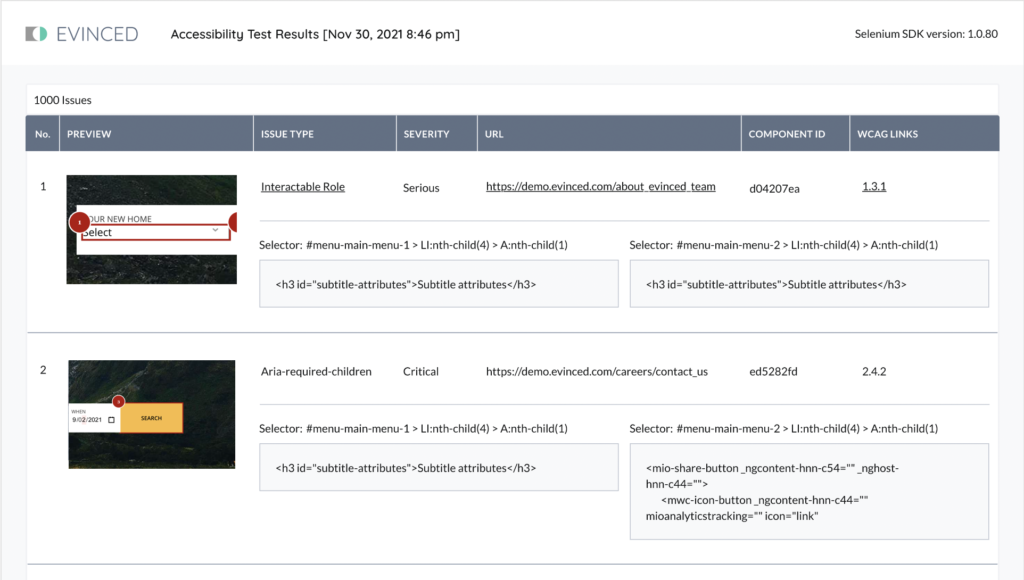
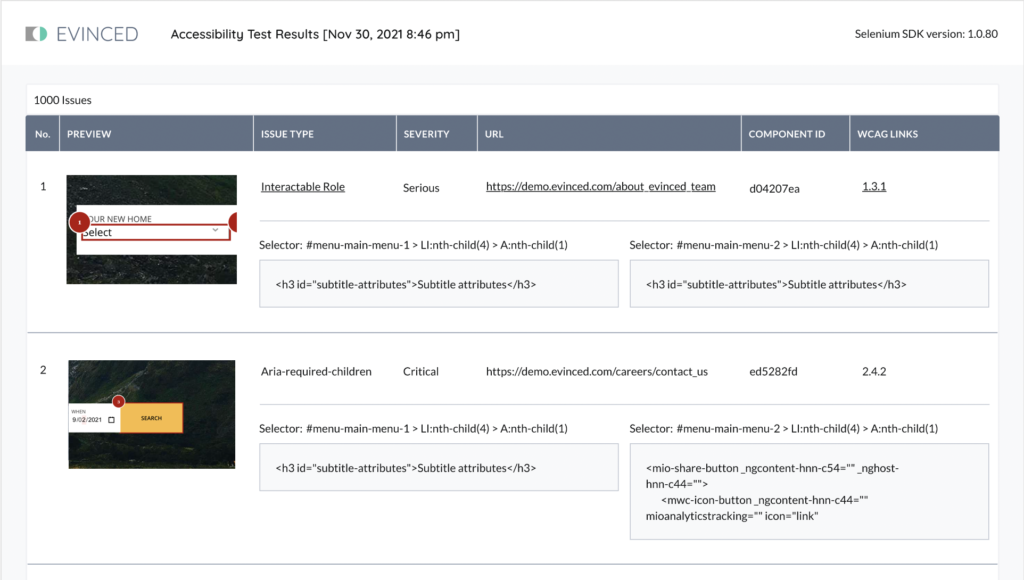
Evinced provides a single, easy to understand, report that contains all of the information to identify, prioritize, reproduce and remediate any issue.

An Evinced report shows what it means to automatically detect accessibility issues. Includes highlighted screenshot, issue type, severity, URL, component ID, WCAG links, css selector, and DOM snippet.

In sum, using our Automation SDK with Selenium is a huge leap in ease of use for developers.

There’s no need to rewrite your existing tests in order to get started, and there’s no need to maintain the tests as your application and its UI changes over time. Accessibility scan results are easy to understand and prioritize, given the single consolidated report provided after the tests are complete.

If you haven’t already, get an Evinced account and check out the Automation SDK for Selenium documentation to get started.

Published on December 14, 2021 Reading time: 6 min

Using our Automation SDK for Selenium with Sauce Labs

Post category: Products
Selenium and Sauce Labs help to auto-detect accessibility issues

Having worked closely with Selenium for the past 7 years, I love the idea of getting as much value from functional UI tests as possible.

One way to do that is to add accessibility testing, as well. This allows us to shift a11y testing left discovering issues earlier when they are faster, easier, and cheaper to fix. Add to this the power of the Sauce Labs Selenium grid with its instant scalability and actionable test insights and we have a solution that will help us dramatically improve end user experience for everyone.

Two advantages of the Evinced Selenium SDK

The advantages of the Evinced Selenium SDK over other accessibility tools are two fold. First, there is no need alter individual test code!!

(Go ahead and read that again.)

Anyone that has used other a11y Selenium integrations understands the pain of having to add an accessibility scan after every interaction with the page that causes a significant DOM shift. An end to end test might have 10+ scans! Not only does this cause continual maintenance and reliability issues, but every time you add a scan to a test it creates a report that must be managed. This means organizing dozens of reports and wasting time with a mess of duplicate issues. Evinced provides a single detailed report at the conclusion of your tests with all the details you need to understand the issues and fix them quickly.

Additionally, unlike other tools that rely on syntax analysis, our Automation SDK for Selenium uses computer vision to model the UX intent and actions to the actual implantation. This approach allows Evinced to find more critical accessibility issues that were once only found with manual testing.

In this post we will discuss how easy it is to take an existing Selenium test built to run on Sauce Labs and add the Evinced accessibility scanner to pinpoint accessibility issues along the way.

How it all works together

So, let’s take a look at our Sauce Labs example test:

import com.evinced.dto.results.Issue;
import com.evinced.dto.results.Report;
import com.evinced.utils.ChromeOptionsHelper;
import com.evinced.EvincedReporter;
import io.github.bonigarcia.wdm.WebDriverManager;
import org.junit.*;
import org.junit.rules.TestName;
import org.openqa.selenium.By;
import org.openqa.selenium.WebDriver;
import org.openqa.selenium.WebElement;
import org.openqa.selenium.*;
import org.openqa.selenium.chrome.ChromeDriver;
import org.openqa.selenium.chrome.ChromeOptions;
import org.openqa.selenium.edge.EdgeOptions;
import org.openqa.selenium.firefox.FirefoxOptions;
import org.openqa.selenium.remote.DesiredCapabilities;
import org.openqa.selenium.remote.RemoteWebDriver;
import java.net.MalformedURLException;
import java.net.URL;
import java.rmi.Remote;
import java.util.List;

public class SauceLabsTest {
    // Sauce Labs username and access key stored as environmental variables
    public String sauce_username = System.getenv("SAUCE_USERNAME");
    public String sauce_accesskey = System.getenv("SAUCE_ACCESS_KEY");
    // Test base url
    public static final String demoPage = "https://demo.evinced.com/";
    private WebDriver driver;
    
    @Before
    public void setUp() throws MalformedURLException {
        // sauceOtps pass the Sauce Labs specific paramaters 
        MutableCapabilities sauceOpts = new MutableCapabilities();
        sauceOpts.setCapability("username", sauce_username);
        sauceOpts.setCapability("accessKey", sauce_accessKey);
        sauceOpts.setCapability("name", "Evinced A11y Selenium SDK Demo");
        sauceOpts.setCapability("screenResolution", "2048x1536");
        ChromeOptions chromeOpts = new ChromeOptions();
        chromeOpts.setCapability("browserVersion", "latest");
        chromeOpts.setCapability("platformName", "macOS 11");
        chromeOpts.setCapability("sauce:options", sauceOpts);
        // Set the Sauce Labs endpoint as the remote URL location
        URL sauceURL = new URL("https://ondemand.us-west-1.saucelabs.com/wd/hub");
        driver = new RemoteWebDriver(sauceURL, chromeOpts);
    }
    
    @After
    public void tearDown() {
        driver.quit();
    }
    
    @Test
    public void evincedTrvlTest() {
        driver.get(demoPage);
        // Click "Your New Home" dropdown
        driver.findElement(By.cssSelector("div.filter-container > div:nth-child(1) > div > div.dropdown.line")).click();
        // Click "Where" dropdown
        driver.findElement(By.cssSelector("div.filter-container > div:nth-child(2) > div > div.dropdown.line")).click();
        // Click "When" date picker
        driver.findElement(By.cssSelector(".react-date-picker")).click();
        // Click on the "Search" Button
        driver.findElement(By.className("search-btn")).click();
        // Assert we have navigated to the results page
        Assert.assertEquals("Page two | Evinced, Demos site", driver.getTitle());
    }
}

The first place we want to take a look at is the @Before method. This is where we will want to initiate the EvincedWebDriver class by passing in the RemoteWebDriver instance sauceDriver that has created a Selenium session on the Sauce Labs cloud. Check out the Sauce Labs platform configurator for all the information needed to select a testing environment.

We can then start the Evinced engine using the evStart() method. The engine will continuously run in the background tracking all DOM changes and collecting a11y violations as the tests execute.

private EvincedWebDriver driver;

@Before
public void setUp() throws MalformedURLException {
    // sauceOtps pass the Sauce Labs specific paramaters 
    MutableCapabilities sauceOpts = new MutableCapabilities();
    sauceOpts.setCapability("username", sauce_username);
    sauceOpts.setCapability("accessKey", sauce_accessKey);
    sauceOpts.setCapability("name", "Evinced A11y Selenium SDK Demo");
    sauceOpts.setCapability("screenResolution", "2048x1536");
    ChromeOptions chromeOpts = new ChromeOptions();
    chromeOpts.setCapability("browserVersion", "latest");
    chromeOpts.setCapability("platformName", "macOS 11");
    chromeOpts.setCapability("sauce:options", sauceOpts);
    // Set the Sauce Labs endpoint as the remote URL location
    URL sauceURL = new URL("https://ondemand.us-west-1.saucelabs.com/wd/hub");
    sauceDriver = new RemoteWebDriver(sauceURL, chromeOpts);
    //Pass the sauceDriver instance to the EvincedWebDriver
    driver = new EvincedWebDriver(sauceDriver);
    // Start the Evinced engine continuously scanning for a11y issues
    driver.evStart();
}

The last thing we need to do is stop the engine and generate the accessibility reports. We can do that in the @After method. A Report object is created when we stop the Evinced engine using the evStop() method. We can then choose to export the accessibility report as a JSON or HTML report (or both!).

@After
public void tearDown() {
    // Stop the Evinced engine and generate the report object
    Report report = driver.evStop();
    // Export the report - JSON
    EvincedReporter.writeEvResultsToFile("Evinced-Sauce-A11y-JSONReport", report, EvincedReporter.FileFormat.JSON);
    // Export the report - HTML
    EvincedReporter.writeEvResultsToFile("Evinced-Sauce-A11y-HTMLReport", report, EvincedReporter.FileFormat.HTML);
    driver.quit();
}

We are now ready to execute our test!

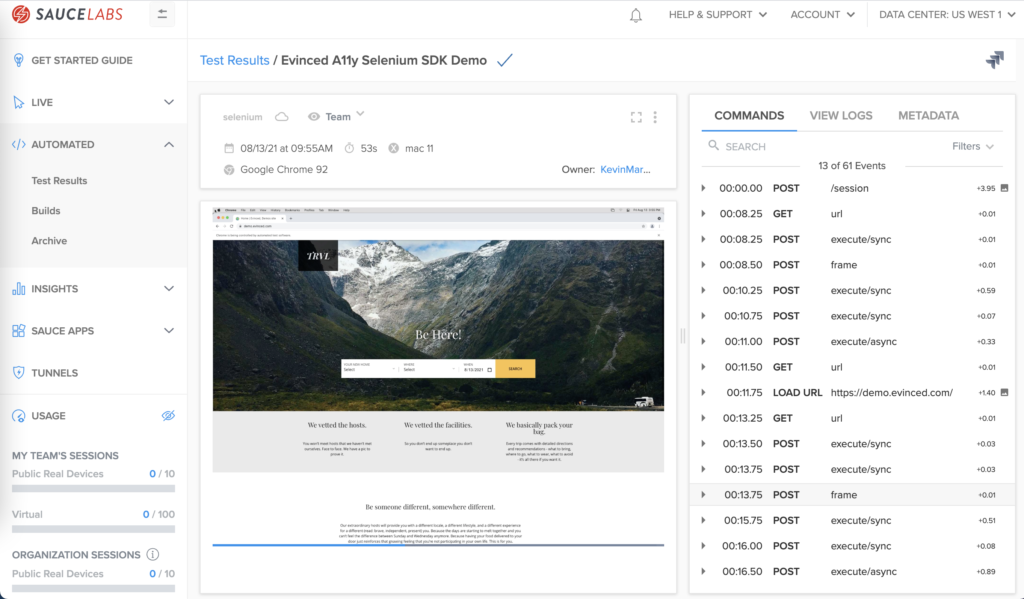
Sauce Labs website. The TRVL website is displayed in the video of the test execution. Commands, logs, and metadata options are available.

Not only do we gain all of the additional insights provided by Sauce Labs such as videos, logs, screenshots, and HAR file to make debugging our functional test quicker and easier, but we also get a detailed Evinced HTML and/or JSON accessibility report containing all issues found, severity levels, descriptions, effect on end users, and actionable information on how to resolve the issues.

Evinced html report helps auto-detect accessibility issues. Includes highlighted screenshot, issue type, severity, URL, component ID, WCAG links, css selector, and DOM snippet.

For more info on how to auto-detect accessibility issues, check out the Evinced Automation SDK and the docs for our Selenium implementation, along with the Sauce Labs pages.

Published on December 8, 2021 Reading time: 7 min

Appium, Perfecto and Our Automation SDK

Post category: Products
Use Evinced SDK with Appium and Perfecto to detect mobile accessibility issues

Appium is a popular open source mobile automation tool and has a significant advantage with its approach to automated mobile testing.

Notably, Appium is cross-platform meaning you can test both iOS and Android from the same framework. I think we all can agree that minimizing the number of context switches required in a given day is always better.

Evinced Appium SDK

With the addition of the Evinced Appium SDK your tests can return even more value by pinpointing accessibility issues as well.

The Evinced API goes beyond what the iOS and Android accessibility APIs offer to help you find more issues that could be impacting the accessibility of your application. In addition, Evinced uses advanced algorithms to create a single actionable report that is easy to digest. Having had the pleasure of wading through a sea of 20+ reports created based on individual scans, this is a feature I am very excited about.

The one thing missing from our even more powerful testing practice is the ability to test on a wide variety of devices and operating systems. This is crucially important for both the Android and iOS platforms.

For Android, breadth of coverage is extremely important due to the large segmentation in the Android market (Samsung, Google, LG, HTC, OnePlus, Huawei, etc). All these manufacturers take the default Android OS image from Google and make it their own. This creates the need for additional testing to make sure we give the best experience possible to all users. For iOS, you may have noticed that once you upgrade your iOS device it is impossible to roll it back to a previous version. This way, proper testing requires a library of iOS devices on all the versions a potential customer might be using to ensure a great experience.

Leveraging Perfecto for Appium tests with Evinced

Fortunately, Perfecto has a comprehensive cloud based continuous testing platform where we can execute our Appium tests with the Evinced Engine to pinpoint accessibility issues on nearly any device and operating system combination.

In this post, we will discuss how to take an existing Appium test running on a Perfecto device and add the Evinced engine to scan for accessibility issues.

Let’s take a look at our Java JUnit Appium test running on a Perfecto Device:

import io.appium.java_client.ios.IOSDriver;
import io.appium.java_client.ios.IOSElement;
import java.io.IOException;
import java.net.MalformedURLException;
import java.net.URL;
import java.util.concurrent.TimeUnit;
import org.openqa.selenium.Platform;
import org.openqa.selenium.remote.DesiredCapabilities;
import org.junit.AfterClass;
import org.junit.BeforeClass;
import org.junit.Test;
import com.evinced.appium.sdk.core.EvincedAppiumSdk;

public class EvincedAppium {

    public static URL url;
    public static IOSDriver<IOSElement> driver;
    public static EvincedAppiumSdk a11yValidator;
    
    @BeforeClass
    public static void setupAppiumDriver() throws MalformedURLException, IOException {
        String securityToken = <Your Perfecto Security Token>;
        
        DesiredCapabilities capabilities = new DesiredCapabilities("", "", Platform.ANY);
          capabilities.setCapability("model", "iPhone.*");
          capabilities.setCapability("app", "<APP_LOCATION>"); // Set Perfecto Media repository path of App under test.
          capabilities.setCapability("bundleId", "com.bundle.id"); // Set your App's bundle Id here
          capabilities.setCapability("enableAppiumBehavior", true);
          capabilities.setCapability("autoLaunch", true); // Whether to install and launch the app automatically.
          capabilities.setCapability("openDeviceTimeout", 2); // Waits for 2 minutes before device connection timeout
          capabilities.setCapability("iOSResign",true);
          capabilities.setCapability("platformName", "iOS");
          capabilities.setCapability("platformVersion", "14.7.1");
          capabilities.setCapability("automationName", "XCUITest");
          capabilities.setCapability("securityToken", securityToken);
    
        driver = new IOSDriver<IOSElement>(new URL("https://partners.perfectomobile.com/nexperience/perfectomobile/wd/hub"), capabilities);
        driver.manage().timeouts().implicitlyWait(20, TimeUnit.SECONDS);
    }
    
    @AfterClass
    public static void tearDown() {
        driver.quit();
    }
    
    @Test
    public void testStationsScreenIsAccessible() {
        IOSElement firstStationTableCell = driver.findElement(MobileBy.className("StationTableViewCell"));
        firstStationTableCell.click();
        IOSElement playButton = driver.findElement(MobileBy.className("XCUIElementTypeButton"));
        playButton.click();
        Assert.assertTrue(!playButton.isDisplayed());
    }
}

The first place we want to take a look at is the @BeforeClass method. This is where we will want to initiate the EvincedAppiumSdk class by passing in the IOSDriver instance that has created an Appium session on the Perfecto device cloud. This will not impact any of the existing functionality of the driver, it will simply add the tools needed to add accessibility scans to our test. Check out this guide for all the information needed to select a cloud device. Next, add your Evinced service ID and API key for to authenticate the Appium SDK. These credentials can be found by logging into the Evinced Product Hub.

@BeforeClass
public static void setupAppiumDriver() throws MalformedURLException, IOException {
    String securityToken = <Your Perfecto Security Token>;
    
    DesiredCapabilities capabilities = new DesiredCapabilities("", "", Platform.ANY);
      capabilities.setCapability("model", "iPhone.*");
      capabilities.setCapability("app", "<APP_LOCATION>"); // Set Perfecto Media repository path of App under test.
      capabilities.setCapability("bundleId", "com.bundle.id"); // Set your App's bundle Id here
      capabilities.setCapability("enableAppiumBehavior", true);
      capabilities.setCapability("autoLaunch", true); // Whether to install and launch the app automatically.
      capabilities.setCapability("openDeviceTimeout", 2); // Waits for 2 minutes before device connection timeout
      capabilities.setCapability("iOSResign",true);
      capabilities.setCapability("platformName", "iOS");
      capabilities.setCapability("platformVersion", "14.7.1");
      capabilities.setCapability("automationName", "XCUITest");
      capabilities.setCapability("securityToken", securityToken);

    driver = new IOSDriver<IOSElement>(new URL("https://partners.perfectomobile.com/nexperience/perfectomobile/wd/hub"), capabilities);
    driver.manage().timeouts().implicitlyWait(20, TimeUnit.SECONDS);
    evincedAppiumSdk = new EvincedAppiumSdk(driver);
    evincedAppiumSdk.setupCredentials("<Evinced Service ID>","<Evinced API Key>");
}

Now that we have added the capabilities need to the driver, the next step is to identify in our test where adding accessibility scans will give use the maximum coverage of our application. This will likely be after a tap or a swipe that takes us to a new page or opens a menu. Taking a look at our test we can identify the following points:

@Test
public void testStationsScreenIsAccessible() {
    // The main application screen has loaded. Let's scan for a11y issues!
    IOSElement firstStationTableCell = driver.findElement(MobileBy.className("StationTableViewCell"));
    firstStationTableCell.click();
    // We have clicked on a cell that has taken us to a new page. Let's scan for a11y issues!
    IOSElement playButton = driver.findElement(MobileBy.className("XCUIElementTypeButton"));
    playButton.click();
    // We have now entered the player view. Let's scan for a11y issues!
    Assert.assertTrue(!playButton.isDisplayed());
}

Now that we have identified the points in our test that would be good to scan, lets add the code:

@Test
public void testStationsScreenIsAccessible() {
    // Let's scan for a11y issues!
    evincedAppiumSdk.analyze();
    IOSElement firstStationTableCell = driver.findElement(MobileBy.className("StationTableViewCell"));
    firstStationTableCell.click();
    // Let's scan for a11y issues!
    evincedAppiumSdk.analyze();
    IOSElement playButton = driver.findElement(MobileBy.className("XCUIElementTypeButton"));
    playButton.click();
    // Let's scan for a11y issues!
    evincedAppiumSdk.analyze();
    Assert.assertTrue(!playButton.isDisplayed());
}

In this test we have added the scans directly to test code for demonstration purposes. For actual implementation we would recommend adding the scans to existing page objects methods to make maintenance simple and easy.

The last thing we need to do is generate the report of all the scans. We can do that in the @AfterClass method.

@AfterClass
public static void tearDown() {
    List<Report> reports = evincedSdk.reportStored(true);
    driver.quit();
}

This single line of code will automatically compile all of the data from the scans and generate a set easy to digest HTML and JSON report files.

We are now ready to execute our test!

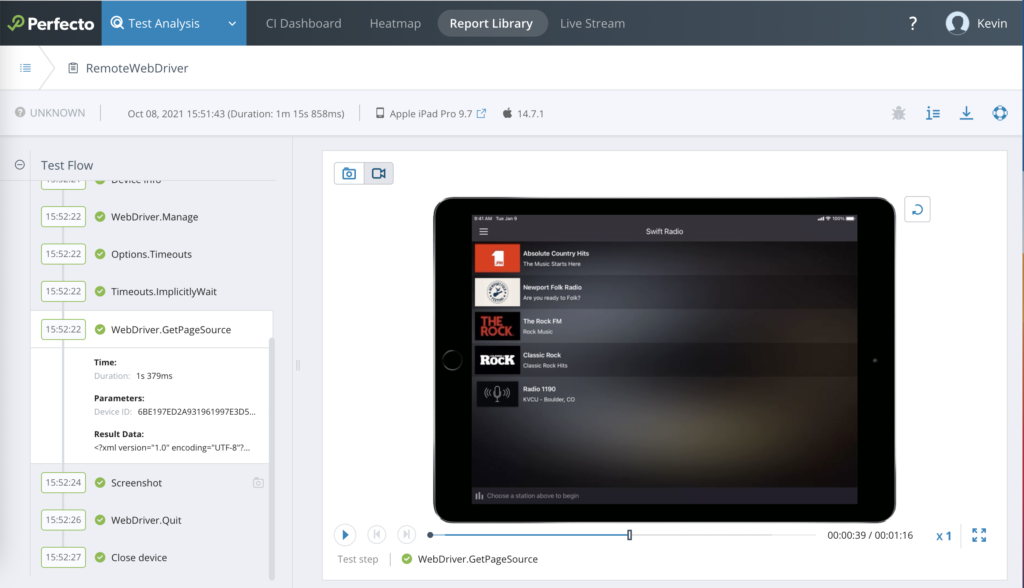
How to detect mobile accessibility issues, an example. An iPad within the Perfecto UI with the Swift Radio application launched. The left side contains a list of commands executed during the test.

Not only can we run our test on any of the hundreds of devices and operating system versions Perfecto provides, we also gain the additional insights provided such as videos, logs, and screenshots to make debugging our functional test quicker and easier.

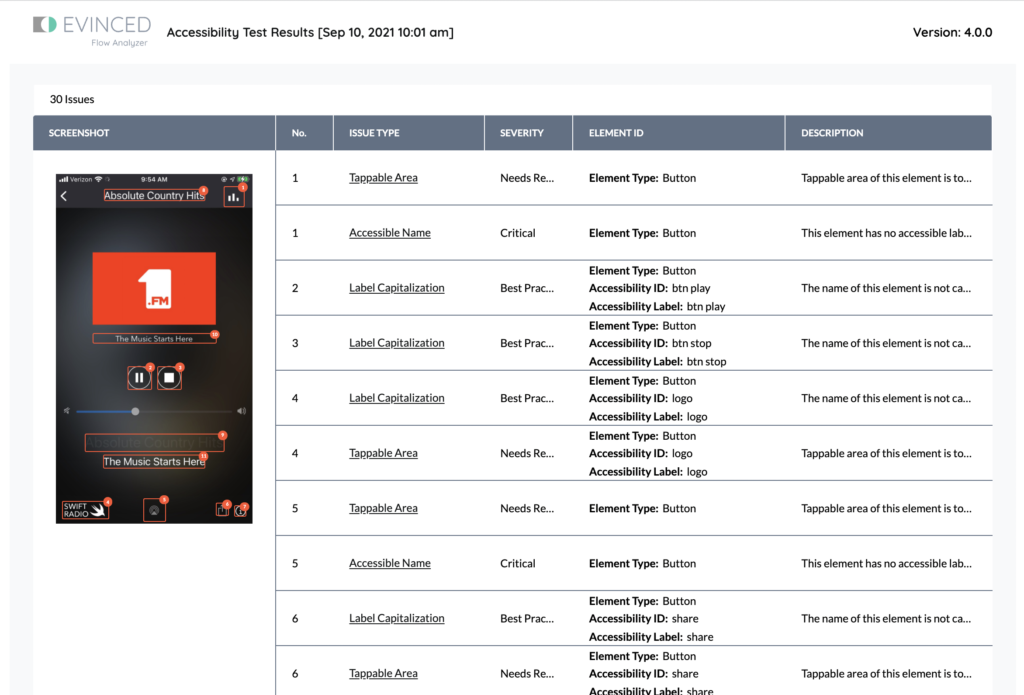
This is extremely powerful combined with the actionable Evinced HTML and/or JSON accessibility report containing all issues found, severity levels, descriptions, effect on end users, and a link to actionable information on how to resolve the issues.

An Evinced html report that contains a screenshot with several accessibility issues highlighted. The report contains Issue Type, Severity, Element ID and Description.

Check out the Evinced and Perfecto pages for more information on getting started!

Published on October 20, 2021 Reading time: 5 min

Our Automation SDK in a CI Pipeline with Jenkins and Selenium

Post category: Products
Looking at CI integration with Jenkins

Integrating an accessibility testing tool into an existing test automation suite can be challenging.

In this post, we will suggest a simpler approach that you can use to add Evinced’s accessibility engines into your tests with as little effort as possible.

The Evinced Selenium SDK is uniquely positioned for a plug and play approach because it does not interact with test code directly. This has distinct advantages. First, because all of the needed setup is in auxiliary classes or methods, the tests stay exactly as the developer intended. This also means there is nothing needed to setup or maintain tests. This greatly reduces the friction created with the introduction of new tools and dramatically reduces the time it takes to start seeing a return on investment in accessibility testing.

Adding Evinced accessibility scans to your existing tests

So let’s dig in! But first, please note that every development environment is different and customization will likely be needed to suit individual needs. Also, this is not the ONLY way to implement the Evinced Selenium SDK, but we do feel like the concept presented provides a great solution for large organizations that have numerous teams and complex needs.

To add evinced to our tests we simply need to add these 4 lines of code to our test framework.

// Start Evinced
driver = new EvincedWebDriver(new ChromeDriver(chromeOptions));
driver.evStart();

// Stop Evinced
Report report = driver.evStop();
EvincedReporter.writeEvResultsToFile(testName.getMethodName(), report, EvincedReporter.FileFormat.HTML);

Most modern test frameworks have the concept of before and after hooks/methods that we can utilize to start and stop evinced within our framework. Using JUnit it would look like this:

@Before
public void setUp() {
	driver = new EvincedWebDriver(new ChromeDriver(chromeOptions));
		driver.evStart();
}

@After
public void tearDown() {
	Report report = driver.evStop();
	EvincedReporter.writeEvResultsToFile(testName.getMethodName(), report, EvincedReporter.FileFormat.HTML);
	driver.quit();
}

At this point we could just simply add your tests to this script and everything would work perfectly fine. But let’s think about the developers. We want them focused on their task of developing great software and not worrying about Selenium drivers, adding the Evinced engine, generating reports etc. We would recommend moving the tests to their own class that extends a base class containing these Before and After methods. Here is what an example class would look like:

imports ...

public class BaseAccessibilityTest {

	public EvincedWebDriver driver;

	@Before
	public void setUp() {
		ChromeOptions chromeOptions = ChromeOptionsHelper.getHeadlessOptionsConfiguration();
		driver = new EvincedWebDriver(new ChromeDriver(chromeOptions));
			driver.evStart();
	}

	@After
	public void tearDown() {
		Report report = driver.evStop();
		EvincedReporter.writeEvResultsToFile(testName.getMethodName(), report, EvincedReporter.FileFormat.HTML);
		driver.quit();
	}
}

Then our test classes simply need to extend this base class:

imports ...

public class SampleAccessibilityTest extends BaseAccessibilityTest {
	@Test
	public void demoSiteNavigationTest() {
		driver.get("https://demo.evinced.com/");
		// interacting with the page - opening all dropdown
		WebElement firstDropdown = driver.findElement(By.cssSelector("div.filter-container > div:nth-child(1) > div > div.dropdown.line"));
		firstDropdown.click();
		System.out.println("Clicked on first dropdown");
		WebElement secondDropdown = driver.findElement(By.cssSelector("div.filter-container > div:nth-child(2) > div > div.dropdown.line"));
		secondDropdown.click();
		System.out.println("Clicked on second dropdown");
		driver.findElement(By.cssSelector(".react-date-picker")).click();
		System.out.println("Clicked on third dropdown");
	}

	@Test
	public void anotherTest() {
		//Test Code
	}
}

Developers can focus on their work in the test classes not even having to think about the addition of Evinced accessibility scans.

CI integration

Now that our tests are ready to run, what if we want to run the Selenium tests without accessibility scans? How can we configure this to happen automatically as part of a CI/CD pipeline? These are not “nice to haves” when it come to implementation in an enterprise development environment, this is a minimum requirement.

So let’s create a mechanism that easily enables Evinced accessibility scans and just as easily disables them. Because the starting and stopping of the Evinced engine is so simple we can easily use an “if” statement with a flag that would indicate whether to add accessibility scans to the selected tests. One possible flag is to use an environmental variable populated on the CI node at runtime to indicate whether to add accessibility scans or not. For the purpose of this example we will use the variable ADD_A11y and set it to “true” or “false” within our base class.

public class BaseAccessibilityTest {
	public EvincedWebDriver driver;
	String a11yEnabled = System.getenv("ADD_A11Y");

	private boolean isAccessibilityEnabled() {
		return a11yEnabled != null && a11yEnabled.equals("true");
	}

	@Before
	public void setUp() {
		ChromeOptions chromeOptions = ChromeOptionsHelper.getHeadlessOptionsConfiguration();
		driver = new EvincedWebDriver(new ChromeDriver(chromeOptions));
		if (isAccessibilityEnabled()) {
			driver.evStart();
		}
	}

	@After
	public void tearDown() {
		if (isAccessibilityEnabled()) {
			Report report = driver.evStop();
			EvincedReporter.writeEvResultsToFile(testName.getMethodName(), report, EvincedReporter.FileFormat.HTML);
		}
		driver.quit();
	}
}

So here, if the ADD_A11Y variable is set to “true”, the Evinced engine will be started to continuously pinpoint accessibility issues throughout the tests, and if ADD_A11Y is set to “false” the tests will run normally.

Jenkins example

This type of variable can easily be added to the environment section of your pipeline script or set within the Jenkins UI. Below is an example pipeline script:

pipeline {
    agent {
        label '!windows'
    }
    environment {
        ADD_A11Y = 'true'
        // More ENV variables
    }
    stages {
        stage('Test') {
            steps {
              // Test Build steps...
            }
        }
    }

We have now implemented the Evinced SDK in a way that can take full advantage of our existing investment in Selenium. By extending the BaseAccessibilityTest class, we can add accessibility scans to any test in our framework. We can also enable or disable the addition of accessibility tests on demand as part of our CI/CD process using a single flag.

Reports

At the conclusion of our tests, we get a consolidated and detailed Evinced HTML/JSON accessibility report containing all issues found, severity levels, descriptions, effect on end users, and actionable information on how to resolve the issues.

An example of Evinced accessibility reports with CI integration with Jenkins

Interested in seeing this in action? Find more information in our developer documentation and/or contact us to get started!

Published on October 13, 2021 Reading time: 3 min

Introducing our Web Flow Analyzer

Post category: Products
Web flow analyzer helps scan pages for accessibility issues
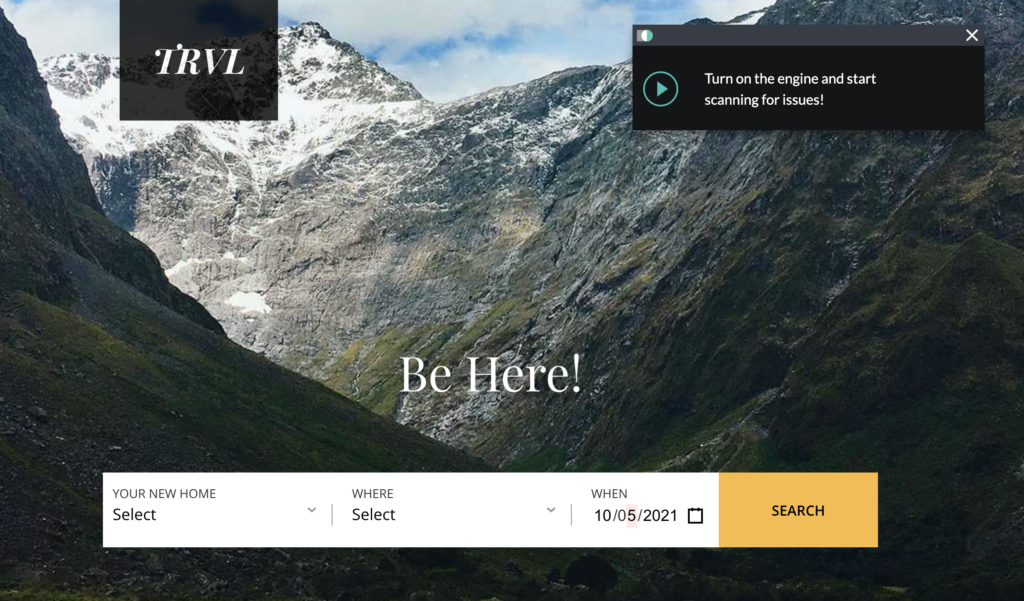
A home page of an example tourism website we can scan for accessibility errors. At the center of the screen there is a heading saying "Be Here!", and below it there is a form with three fields to choose type of habitation, destination, and date, and a search button. At the top right of the screen there is the Evinced Flow Analyzer for Web. On it's left side there is "Start scanning" button and next to it a message "Turn on the engine and start scanning for issues!"

Our Web Flow Analyzer is the perfect tool to analyze entire user flows for devs, QA or anyone looking to easily scan for accessibility issues.

While logging in and completing a transaction, this easy to install chrome plugin will follow you between pages and detect all DOM changes to offer a full view of accessibility issues across the entire flow. For example, when you click on a dropdown, Evinced will detect the DOM mutation and automatically scan the elements that have been added to the page. This makes scanning for accessibility issues incredibly easy.

In addition to being easy to use, the Evinced flow analyzer for web is also able to detect more accessibility issues than any other tool on the market.

Simply push the “Play” button and Evinced will use computer vision and advanced algorithms to automatically detect issues previously only able to be found manually using a keyboard and screen reader.

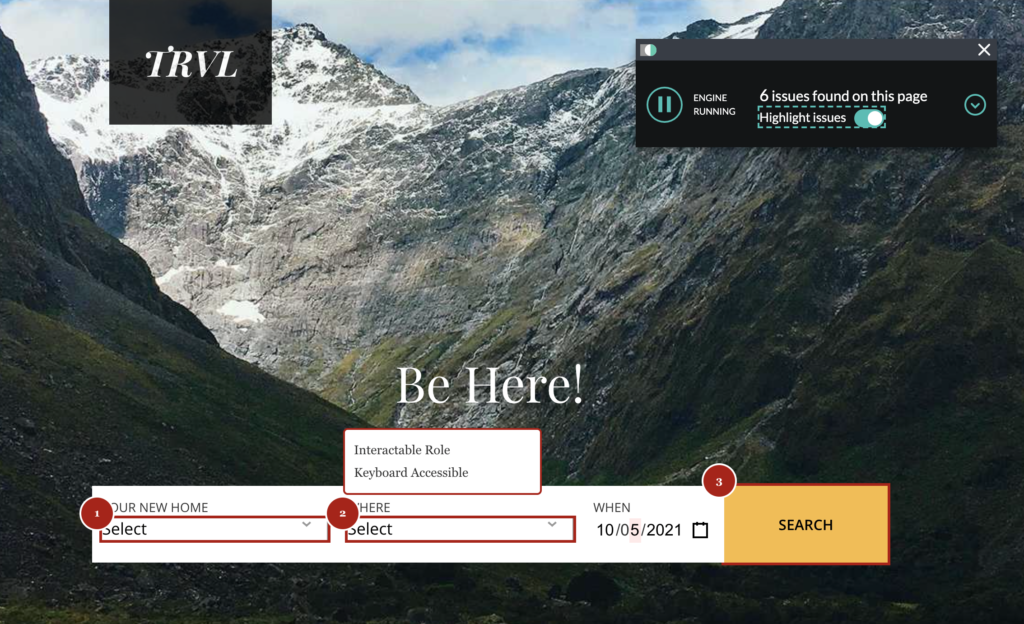
These issues include functional blockers such as Keyboard Accessible, Interactable Role, and Accessible Name that commonly prevent sites from being accessible to all users.

A home page of an example tourism website after starting the Evinced Flow Analyzer for Web. On the bottom of the screen there is a form with a few elements marked by a red frame and a number that represents the issue ID. above one of the form fields there is a tooltip with 2 issue names “Interactable Role” and “Keyboard Accessible”. On the top right of the screen the Evinced Flow Analyzer for Web is showing a total of 6 issues that were found on the page.

As you move through your flow, results for that specific page are available within the onscreen modal.

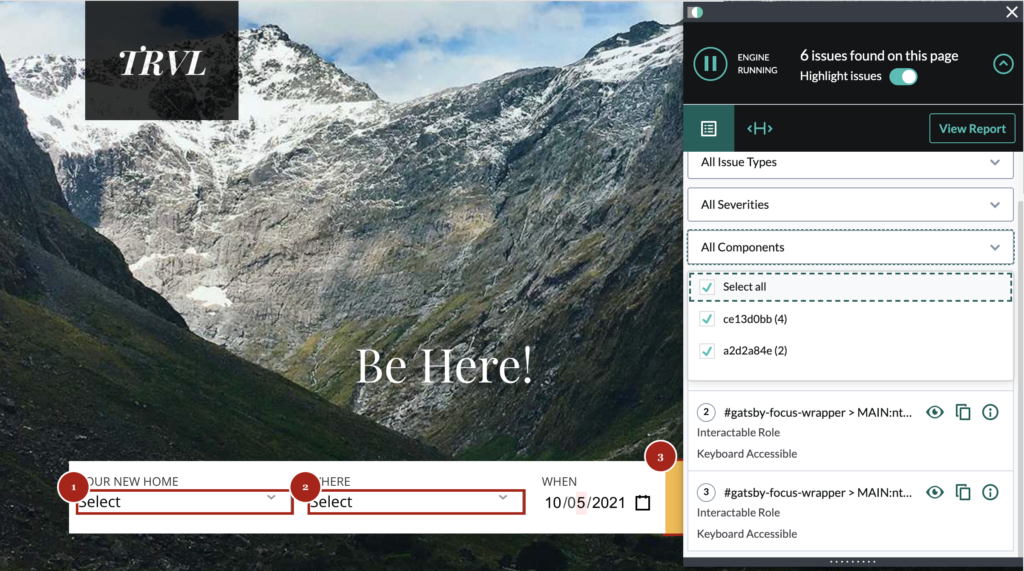
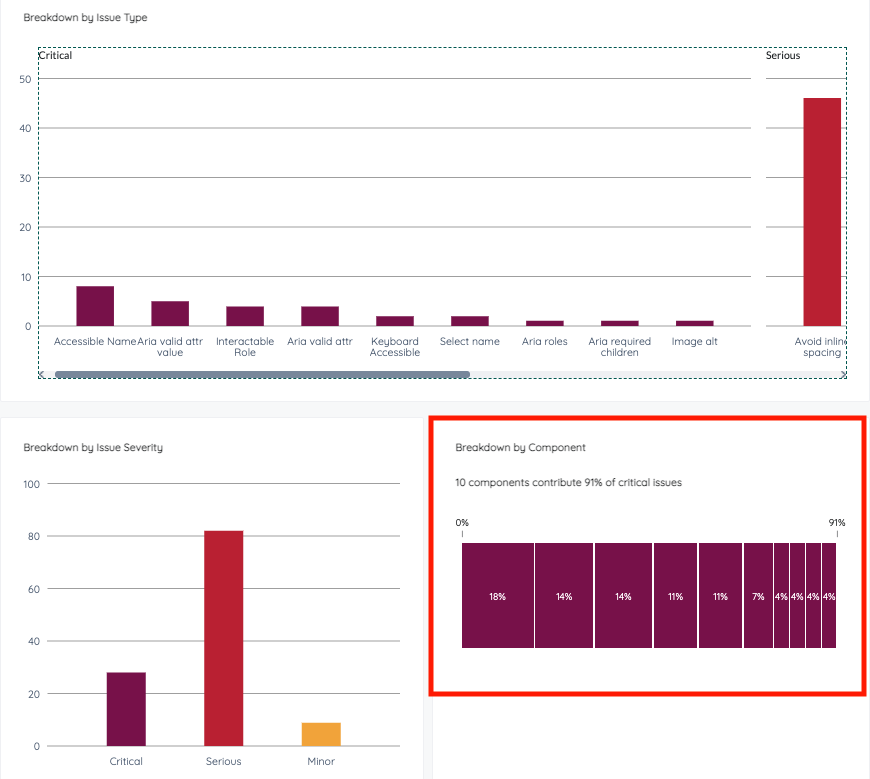
Here you can filter between severity level, issue type, and by component. A component is a set of issues that Evinced has grouped into a repeating code pattern. Components allow you to automatically take thousands of errors and reduce them to a few tens of components that are broken.

This is extremely powerful feature that reduces noise and helps focus conversations with development teams on what is most important. In this example the six issues found have been reduced to two components.

The Evinced Flow Analyzer for Web expanded. The "filter components" drop down is highlighted.

Once the flow is complete a comprehensive report is available containing some exciting new features.

The report now contains Overview, Component, and All Issues pages to provide even more value from the results of your user flow. The Overview page contains visualizations of the data broken down by issue type and severity, but perhaps the most valuable graph is the breakdown by component. This data forms the basis for an auto-generated remediation plan which will dramatically reduce the accessibility burden on the development team.

In this case, if we fix these 10 components we will improve the overall accessibility posture of our site by 91%. This can likely be done in a single sprint, making an immediate impact.

The report thab of the Evinced Flow Analyzer for Web. Showing 3 charts. One shows accessibility issues breakdown by type, the second by severity and the third by component. The components chart is marked by a red frame. On its top there is a text: "10 components contribute 91% of critical issues"

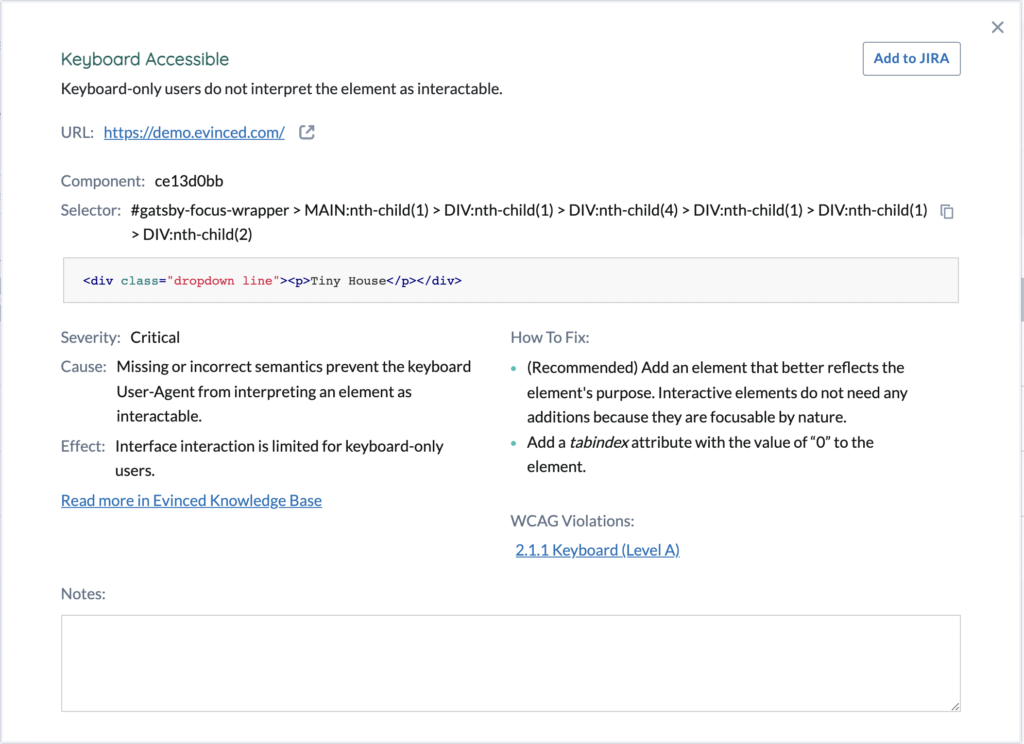
Beyond the overview the report also contains all of the information needed in order to immediately identify, replicate, and remediate issues. This information includes the url, severity level, issue and description, css selector, html snippet and recommendations on how to fix the issue. There is also a link to the relevant WCAG success criteria as well as a link to the Evinced Knowledge Base that has even more information on how to resolve the issue as well as a theory section to help developers understand how to prevent these types of issues in the future.

All of this information can be exported directly to Jira with a single click and the entire report can be exported in PDF or CSV format. These new reports provide even more value and are an exciting addition to the Evinced flow analyzer for web.

So what’s next? Evinced will be adding highlighted screenshots to these reports in the coming months to make it even faster to identify issues!

For more information, check out the Web Flow Analyzer on our website.

Published on September 23, 2021 Reading time: 2 min

Grid Dynamics and Evinced, Inc., announce a long term strategic partnership

Post category: Products
Grid Dynamics and Evinced logos

In recent years, web and mobile app accessibility has become increasingly important to enterprises as tech giants like Apple and Google have made significant investments in making their core platforms accessible to over a billion people globally living with a disability.

However, there has never been a consistent set of accessibility testing tools available across both iOS and Android ecosystems, hindering the ability for enterprises to ensure that the apps they build take advantage of the underlying platform accessibility capabilities​ and at Evinced, our goal is to change that. ​

This is why on September 14, 2001, we announced the launch of the industry’s first complete portfolio of products to enable enterprise developers to weave accessibility into their iOS and Android mobile app development process.

​Today, we are very proud to announce our long-term strategic partnership with Grid Dynamics, a leader in enterprise-level digital transformation services and solutions, to accelerate the implementation of accessibility in the web and mobile app development phase.

The powerful combination of technology and products from Evinced with engineering and implementation services from Grid Dynamics is bringing transformation to native mobile and web app development by providing:

  • Developer and QA solutions: Easy testing on real devices or simulators, local or in the cloud – with no SDK installation
  • Automated testing: implementing accessibility in existing web and mobile automated tests – web (Selenium, Cypress, Webdriver IO etc.) and mobile (Appium, XCUITest, Espresso)
  • Analytics: providing accessibility compliance solutions and engineering leadership with organization-wide analytics insights and visibility into accessibility progress throughout the software development lifecycle —  from development to production 

We are excited for what the future holds and are thrilled to be part of the solution creating a more inclusive environment for over 1 billion people who live with some form of disability, underscoring the critical importance of digital accessibility.