
Published on September 22, 2026 Reading time: 10 min

Accessibility where and when it counts

Post category: Technology
A series of colorful circles and orbs

Post 4 of 5 in our series on AI-assisted code and accessibility. Find our previous posts here, here, and here.

So far in our series on agentic coding and accessibility, we’ve focused on the how of using LLMs to revolutionize the accessibility of coding practices.

But we haven’t focused on the where and the when.

After all, baseline models, prompts, skills, Evinced Harness, and Evinced Resolve, all do their work in the developer’s environment (IDE). That is not at all a bad place to do this work. But it’s not the only place.

And at the developer’s desk, prior to a code commit, is not the only time.

Say hello to the pipeline

To “get to accessible” by relying solely on accessibility guidance in the IDE would be a tall order. Code arrives from multiple teams, from contractors, from a legacy repo nobody has touched since 2021, from dependency bumps, and from machine-generated pull requests. It’s very possible that a meaningful share of what reaches production never met an accessibility-aware developer or tool along the way. And developer habits, while they do change, are hard to change uniformly.

So where do organizations already catch what individuals miss?

In the pipeline, the company’s Continuous Integration and Deployment system (“CI/CD”).

Linting rules, unit tests, security scans: CI/CD is where quality stops being a personal habit and becomes company policy. Indeed, CI/CD is where an engineering team sets its minimum expectations for the code that the team delivers.

If we could just get accessibility to be one of these enforced expectations, the accessibility industry would be transformed.

How we got here

In the past, there were good reasons why accessibility was difficult to justify putting into CI/CD systems.

  • It slowed down the cycle. The ability to fix issues automatically as part of the process didn’t exist. All the system could do was scan, and fail the build based on some minimum conditions. That has the potential to slow the development cycle down. Because an accessibility check that does no more than report a problem creates quite a lot of work: the developer must find the problem in the codebase, reproduce it, assign it, fix it, verify it, and merge it.
  • Developers struggled to get the assistance they needed. Writing a fix, when most developers lack accessibility expertise, is time-consuming. A developer must translate each finding into a code change in the right parts of the code repository. That translation step is the slow, expensive, morale-draining part of accessibility work. A few years ago, to get assistance a developer might have searched Stack Overflow, or asked some peers down the hall. More recently, they’ve asked LLMs, but those systems are spotty at best, as we’ve shown.
  • Detection with legacy systems was weak. At least before Evinced, the legacy tools that might have been rolled into a CI process could only detect approximately 25% of defects, and very few of those were critical ones. Even if the first two of these issues above could be overcome, this still left the bulk of the detection work to slow, expensive manual processes that usually ran only after the bugs had hit production. Better than nothing, perhaps – but not a lot better.

The transformational opportunity

What we are most excited about at Evinced is that these three reasons that have held accessibility back are no longer obstacles.

While we have described Evinced Autopilot elsewhere, it does overcome all three of these problems directly. It fixes as it runs in CI, it only asks of developers that they review already-fixed and already-tested code, and it can detect (and therefore test and fix) approximately 3X more issues than legacy open-source tools like axe-core.

Here is how it works: Autopilot runs inside the CI pipeline, on your infrastructure, with your existing LLM. When code lands, it detects accessibility defects with the Evinced engine against the rendered application, including interactive and dynamic states like open menus, modals, and logged-in views. It generates a fix for each defect. 

The difference between Autopilot and a bare coding agent is what happens next. Autopilot verifies every fix independently by re-testing the original symptom against the rebuilt app. A fix that does not pass does not get counted; it gets iterated until it does pass or the system, for some rare reason, believes it can’t be done. The results arrive as an ordinary pull request, reasoning attached, for a developer to review and approve.

Benchmark results

Of course, it all has to work.

To test that, we turned Autopilot loose in CI (GitHub Actions) on three real open-source applications with deliberately different stacks.

  • A multipage e-commerce storefront in vanilla JavaScript and CSS
  • A React and Material UI admin dashboard
  • A Vue 3 and Tailwind admin dashboard

The idea here was to imagine what would have happened if each of the engineering teams that built these projects had had Autopilot running inside their CI system at the time that they committed all the code for the entire project. (Note that Autopilot is smart enough to only analyze code that hasn’t already been checked for accessibility, but here, of course, the entire projects were new to Autopilot.)

We let Autopilot run, using Claude 4.6 Sonnet as our partner model, without stopping or touching anything between the initial commit and the completed pull requests. Exhibit 1 shows the results.


Exhibit 1. Autopilot Performance on Three Test Runs

AppDefects
Detected
Total Fixed
(&Verified)
CI Clock
Time
Token
Cost
Cost per Verified FixAddressable
Fixed
Vanilla JS + CSS storefront208208 (100%)22:22$61$0.30208/208 (100%)
React + Material UI dashboard179179 (100%)28:03$41$0.23179/179 (100%)
Vue 3 + Tailwind dashboard291239 (82%)46:15$83$0.35121/141
(86%)
Total678626 (92%)96:40$185$0.30
(overall)
508/528
(96%)

Source: Evinced Autopilot running unattended in CI, one run per app, Claude 4.6 Sonnet. Defects are “critical” or “serious” bugs in Evinced’s classification system. Multiple defects due to an individual component are only counted once. “Addressable” excludes defects inside third-party framework and library code that the tested app’s own developers could not change.

The headline here is that Autopilot detected hundreds of bugs, and of those that were possible to fix, it fixed 96% of them, for about $0.30 each.

In terms of clock time, adding these three CI jobs together meant it took just under 97 minutes to fix 626 accessibility bugs, completely unattended. That’s a bug fixed – not just fixed, remember, but fixed, tested, and verified as fixed by a world leader in accessibility – every 11 seconds.

There is no hiding that these numbers are impressive, but there’s a benefit here that does need calling out. 

Because each of these bugs, had they made it to production, would have cost hours and hours of team-wide communication and work to fix. Even if you agreed that the cost of fixing one of these bugs manually was, say $500, which we would say is optimistic, the net savings to the company owning these tested projects would be in the hundreds of thousands of dollars. Assuming, of course, that it even had the bandwidth to fix them all.

The control run

To be thorough, we wanted to consider whether a team could simply use an LLM out of the box inside a CI system, and how that would compare to Autopilot. 

The obvious worry is that an unguarded agent that fixes an issue and then checks its own work is grading its own homework. LLMs are after all trained on inaccessible code, and are famously overconfident. 

To find out how much that matters, we pointed the same model, Claude 4.6 Sonnet, at the same three apps. We gave it a standard accessibility prompt about how to detect and fix issues, and ran it as a comparison. The results are in Exhibit 2 below.


Exhibit 2. Autopilot vs. Prompted LLM, on Three Test Runs

AppDefects
Detected
Autopilot
Fixes
LLM
Fixes
Autopilot
Fixes/min
LLM
Fixes/min
Autopilot
$/fix
LLM
$/fix
Vanilla JS + CSS storefront208208/208
(100%)
86/208
(41%)
9.312.3$0.30$0.14
React + Material UI dashboard179179/179
(100%)
12/179
(7%)
6.40.9$0.23$0.25
Vue 3 + Tailwind dashboard291239/291
(82%)
28/291
(10%)
5.22.1$0.35$1.01
Total678626
(92%)
126
(19%)
6.53.7$0.30$0.35

Source: Same three apps, same CI harness, Claude 4.6 Sonnet, Evinced Autopilot vs. accessibility-aware LLM prompt. Fixed counts for both are confirmed by the same post-run rescan. Counts are raw instances of critical and serious defects across all pages; a repeated component is counted once per instance.

As a top-line comparison, the LLM fixed dramatically fewer bugs than Autopilot did. Across the three three runs, Autopilot fixed 92% of all the detectable issues, and the LLM – prompted specifically to look for and fix accessibility issues – managed to only fix 19%, which is 5X less.

Looking more deeply, we note that with Autopilot, two of the three projects actually had 100% fix rates. Remember, these defects are classified in our system as critical or serious, so missing even a few of these issues could translate into a roadblock for assistive technology users. That’s particularly troubling in the LLM case, where none of the projects saw their defects drop by even 50%. 

Keep in mind, too, that Autopilot fixes are verified by Evinced, and LLM fixes are… not really verified at all. The LLM simply developed a solution to the perceived problem, implemented it, and reported the item fixed. There was no built-in verification process at all. 

Autopilot was also in the main cheaper per fix and faster per fix, even though it’s doing much more work – testing, iterating, and verifying.

But the important part is what did not happen: Autopilot never marked any of the leftovers done. Unverified fixes stayed unverified, which is the desirable behavior; nothing disappeared behind a green checkmark. The leftovers stayed flagged and visible, queued for the next Autopilot pass or a developer.

The takeaway

What we find so exciting about this opportunity is that it’s a chance for accessibility teams to steer the ship in the right direction. 

Accessibility teams are always quite small relative to the number of developers at the same company, and reviewing releases prior to production more than once or twice a month is simply not in the cards.

That has left accessibility teams with three choices:

  • Pick your battles. Be very selective about what gets reviewed prior to release. As some teams release code thousands of times a week, this would need to be very selective indeed.
  • Train thousands. Many of our customers have more than 2,000 front-end developers. Even with online courseware, that’s a challenge.
  • Change habits. Absent training, the only way to change developer coding habits is by introducing tools. These tools have learning curves and developers have individualized preferences. So internal promotional efforts are required, and they are hard to execute well.

Autopilot offers accessibility teams the chance to, in effect, review every single release, at high Evinced standards, without asking developers to change their behavior. And it improves itself, because every pull request reviewed by a developer teaches them something about accessibility, on their own code, at exactly the right teachable moment. That will ultimately translate into fewer bugs put into the system, and into a codebase that stays accessible.

Pipelines protect what you ship next. But most organizations are also staring at what they shipped already: an audit report, a scanner export, a spreadsheet of findings with a legal deadline attached. Turning that backlog into fixed, verified code is a different job, and in this series we’ll turn to that next.

Published on September 18, 2026 Reading time: 7 min

When skills are not enough

Post category: Technology
A series of colorful circles and orbs

Post 3 of 5 in our series on AI-assisted code and accessibility.

So far in our series on AI and accessibility, we’ve covered two key points:

In this post, we’re going to cover the most well-known example of a third approach to using LLMs in combination with agentic coding, and that’s to use a skill.

In the world of agentic coding, a skill is a reusable, task-specific set of instructions, knowledge, and procedures that an operator can give an LLM. They are versatile, in that they can include not just instructions but also copies of correct and incorrect code examples, scripts for running third-party tools, and rules. Once the skill is built, it can be invoked easily when a relevant task presents itself, and all of the information in the skill doesn’t have to squeeze, over and over again, into the prompt window of an LLM.

Researcher Michael Fairchild, who’s a key figure behind the LLM A11y Eval project that we have cited before, published a skill in May 2026 called Building Accessible UI. Fairchild published some promising results, so we decided to add to the state of knowledge here by running and documenting our own tests using it.

Our results were also good. But they were also, as it turns out, not nearly good enough.

Setting up the experiment

A skill like Building Accessible UI works best at code-generation time: it rides along while the model writes the code, steering it toward accessible patterns and checking the output as it goes. So that is what we tested. We returned to the nine-app protocol from our first two posts: three models, three frameworks, one identical single-page app spec, this time with the skill installed and invoked during the build. For comparison, we ran the same protocol with Evinced Harness, our MCP-based detection and repair tooling, in the loop instead. (Skill runs used GPT 5.2, which had replaced GPT 5.1.)

First, a reality check on model progress: benchmarked for a separate study, every newer model still produced frankly terrible accessibility results out of the box, several worse than their predecessors.


Exhibit 1. Baseline Accessibility Performance of Models, with Release Date

Model, Release DateErrors*Model, Release DateErrors*
Claude 4.5 Sonnet, Sept 202536Claude Opus 4.8, May 202694
GPT 5.1, Nov 202546GPT 5.5, Apr 202664
Gemini 2.5 Pro, Mar 202553Gemini 3.1 Pro, Feb 202651

Average critical + serious accessibility errors made when building our reference app, as measured by Evinced using default settings.

The newer models did not just fail to improve: for two of the three vendors, the newest model shipped substantially more critical and serious defects than its predecessor. Claude’s count nearly tripled, and GPT’s rose about 40%, with only Gemini holding roughly flat. The trend is not slowly improving. It points the wrong way.

“Wait for better models” is not a plan we would recommend.

Counting defects, not echoes

A methodology note. Scanners count instances: one broken checkbox row, repeated 46 times in a list, counts as 46 issues when it is really one mistake. So in this post we count components: distinct root causes, deduplicated by issue type and element pattern. It is the more conservative number, and the one a developer actually has to fix. We also limit the counts to critical and serious defects, the two grades that block or badly impede assistive-technology users.

The work to be done

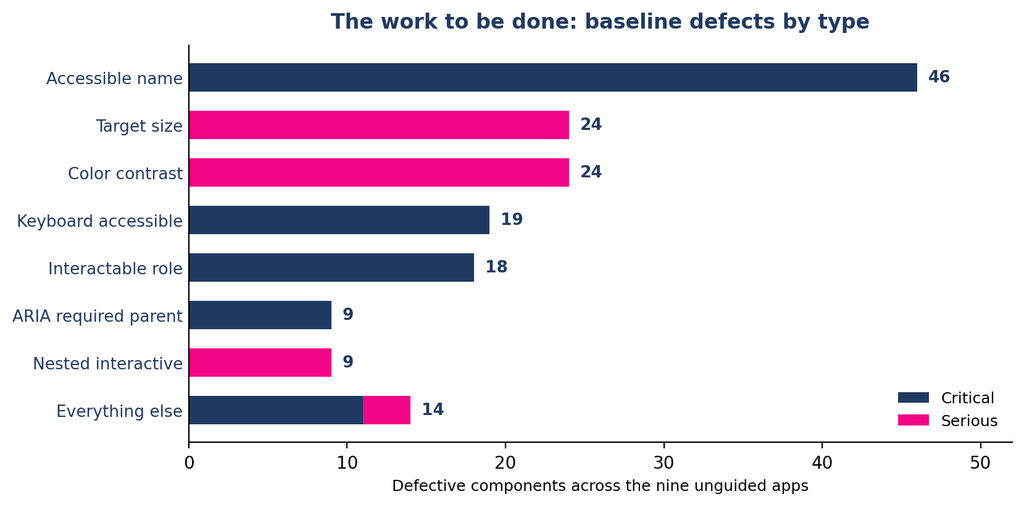
So what did the unguided models build? They built 9 baseline apps, with: 18.1 defective components each, on average. Exhibit 2 shows the breakdown by type:


Exhibit 2. Baseline Component Accessibility Defects by Type

Bar chart showing baseline critical and serious defects by type. 
Ranking most common to least:
Accessible name (46)
Target size (24)
Color contrast (24)
Keyboard accessible (19)
Interactable role (18)
ARIA required parent (9)
Nested interactive (9)
Everything else (14)

Controls with no accessible name, keyboard access, or proper role make up most of the critical defects. Target size and color contrast dominate the serious defects, with a tail of ARIA structure and focus-order problems. 

This is the to-do list any tool would need to clear. How did our models and skills perform?

The results

Here is how each approach handled it.


Exhibit 3. Defective Components Per App Built, by Approach

ApproachCriticalSeriousCritical
+ Serious
Apps with Zero Critical Defects Remaining
No guidance11.46.718.10 of 9
Accessibility prompt (see post #2)1.211.913.16 of 9
Building Accessible UI skill2.15.87.94 of 9
Evinced Harness0.00.70.79 of 9

Averages are across nine apps (three models, three frameworks), measured by Evinced Web Flow Analyzer.

As a topline note, the skill is the best free option we have tested. It cut critical components by 82%, a large improvement over baseline. And while this is marginally less effective than the accessibility prompt alone, its improvement came without the accessibility prompt’s surge in serious component defects. If your budget is absolute zero, the skill is a better choice than the prompt. 

Of course, the “free” option could still turn out to be quite expensive, and even putting aside token costs. Note above that none of the free options get to true accessibility. What you save up front will be spent on the manual effort to find, reproduce, assign, fix, and verify everything that was missed. And while that plays out, your site or app will be inaccessible in some way to some people.


Exhibit 4. Percent Reduction (and Increase) in Critical and Serious Defective Components Per App, By Model and Trial

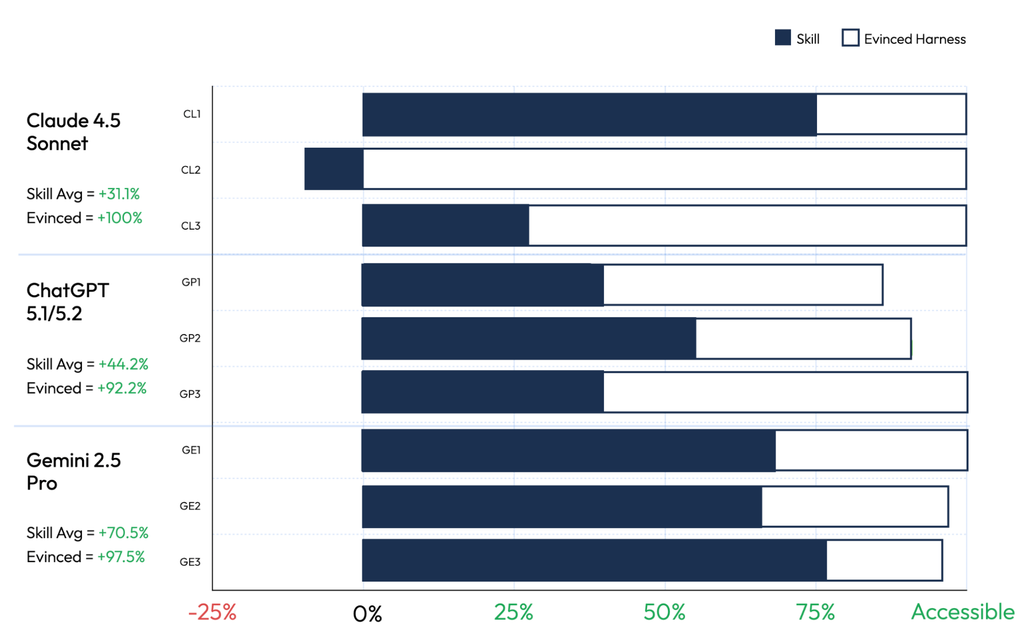
Horizontal bar chart of accessibility improvement across nine builds, three each from Claude 4.5 Sonnet, ChatGPT 5.1/5.2, and Gemini 2.5 Pro. Evinced Harness reaches at or near fully accessible on every build, while the Skill alone averages between 31 and 71 percent and regresses on one build. Analysis below.

Accessible = a 100% reduction in autodetected critical and serious defects. 

Frameworks: 1 = React + Bootstrap, 2 = Svelte + Tailwind, 3 = Plain JS + CSS.

Looking at the skill’s performance by trial, note that in at least one trial – Claude 4.5 paired with Svelte and Tailwind – the skill actually made things worse. But by and large it had a positive impact.

On balance, the net improvement from the skill was slightly less than half that of Evinced Harness, our own tool for helping developers build, test, and fix code for accessibility. Across everything we have measured in this series, Harness is the only approach that gets to zero components with critical defects.

The takeaway

Given that the skill did show some improvements, we asked ourselves whether it could perform better. Our best answer, at the moment, is that this current performance for a free skill is something of a plateau. 

Why? Because a skill guides the model with patterns and verifies the result with checks, and a free skill must build those checks on free tools, which, in practice, means axe-core.

At this point, we are in familiar territory. In every analysis we have done, Evinced identifies dramatically more defects than axe-core, and depending on the study and methodology it ranges from 2.5X to 3.0X. (This comparison is for all types of issues, but for critical issues only the gap is often much, much wider. See also the comparative validations count in our article “What’s In a Checkpoint, Charlie?”)

So in effect, it’s not so much a limit of the skill itself, as it is of the tool it’s using to detect accessibility bugs. Anything built on a tool that has lots of false negatives (i.e., bugs it didn’t detect but should have) will itself have lots of false negatives. And strictly speaking, it’s a little worse than that. As some have pointed out, skills can help a base model pass most – but not even all – of axe-core’s checks.

This performance ceiling holds for any tool you evaluate, from any vendor. Before you ask anything else, ask what engine it is built on. Because a defect your detection tool cannot see does not go away. It ships, it waits, and one day it will grow into an expensive problem.

In our next post, we’ll examine how we can automatically and continuously monitor and repair these problems, before they have a chance to grow. See you soon.

Published on September 9, 2026 Reading time: 5 min

The promise and peril of prompting

Post category: Technology
A series of colorful circles and orbs

Post 2 of 5 in our series on AI-assisted code and accessibility.

In our first discussion of LLM-assisted coding and accessibility, we tested the native ability of LLMs, out of the box, to write accessible code.

But many teams don’t use models that way. Instead, they provide a sometimes-lengthy set of instructions to the LLM along with the basic work request. These “prompts” are something of a cottage industry, too – engineers compare them, discuss them, and share them.

Indeed, there is a prompt that nearly every accessibility-minded  team tries sooner or later:

Follow WCAG 2.2 AA. Use semantic HTML. Make it work with a keyboard. 

As a public service, we decided to re-run our experiment from our first discussion but with this in mind.

So we asked the same three models using the same three frameworks to each build a single-page app – so nine apps in total were built. Only this time, we gave the models the exact prompt above to guide the model while it did its work. Then we analyzed the built apps for accessibility defects, exactly as we did before.  

Results

In the table below, you can see that the prompt did not fix the problem. It made a trade. Critical defects fell by 57%. Serious defects, the grade just below critical, rose by 49%. The total count of meaningful defects didn’t change.


Exhibit 1. Summary of Results With and Without Accessibility Prompt

BASELINE
Average Defects Created Per App (no accessibility prompt)
EXPERIMENT
Accessibility Prompt Included 
RESULTS
% Change, Experiment vs. Baseline
Critical defects219-57%
Serious defects2436+49%
Critical + serious45450%

Source: Evinced Web Flow Analyzer. N = 9 apps, built using combinations of 3 frontier models and 3 frameworks. Moderate and minor defects were near zero in both runs; across all grades combined, the net change was a 1.2% decline.

Fixing the famous

Critical bugs – the ones that stop assistive technology users in their tracks –  did see measurable improvement and were cut by slightly more than half. So by no means perfect, but definitely better.

What we can say is that when you prompt for accessibility, models are best at cleaning up the problems the internet talks about most. Missing image descriptions. Unlabeled buttons. Jumbled headings. Text you cannot read against its background. Those show up constantly in training data for the  models, and they happen to be the worst offenders, which is why the critical count improves while the total barely moves.

The pattern to remember: prompting fixes the famous bugs. Only the famous bugs.

The other side of the trade

Now the price. Serious defects climbed 48.8% on average once we asked for accessibility, and in four of the nine apps the prompt actually increased the serious count. Take Gemini with plain JavaScript: the prompt cleared every one of its 36 critical bugs, but quadrupled its serious count from 10 to 41. Gemini with Svelte fared worst of all: 22 serious bugs became 111, five times as many, and its critical count rose too, 35 to 51.

This is what overcompensation looks like. Chasing the famous fixes, models sprinkle in accessibility markup they do not understand and create brand-new bugs while they are at it. 

Thinking about reliability

What it all comes down to is, can your team rely on an LLM’s accessibility results, even when prompted specially?

Recall from Exhibit 1 that on balance, the number of critical + serious defects when using the accessibility prompt was unchanged vs. the baseline. 

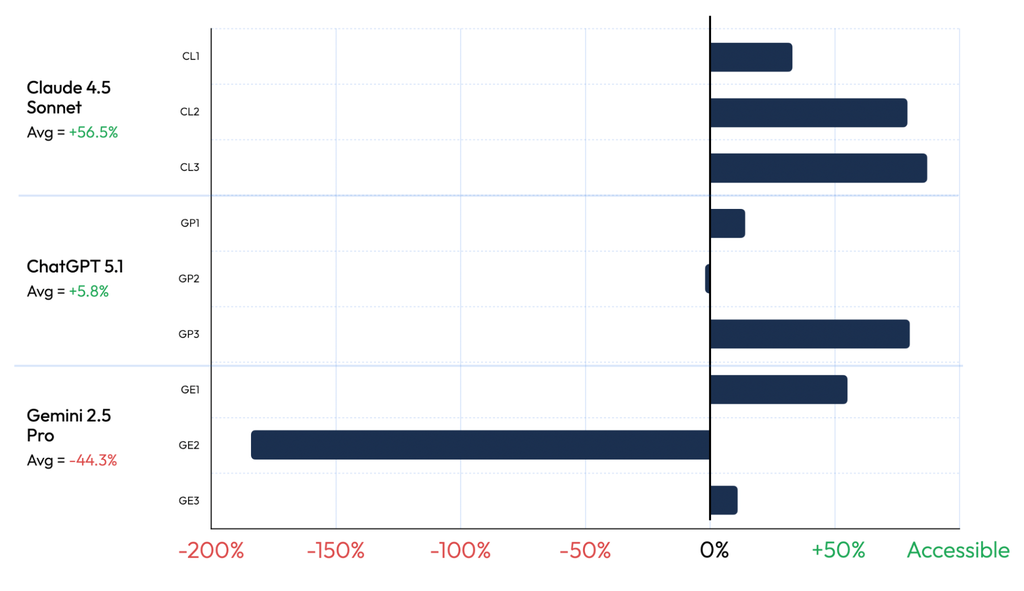
But we also wanted to show the variability inside that average. To help discuss that, we’ve reproduced the results below for each of our nine trials.  


Exhibit 2. Critical and Serious Accessibility Bugs Created With and Without an Accessibility Prompt

Bar chart showing the number of accessibility bugs occurring when models were prompted for accessibility. 

ChatGPT 5.1, GP2, and Gemini 2.5 Pro, GE2, both had MORE bugs after prompting. 

Only three models saw more than a 50% improvement rate:
Claude 4.5 Sonnet, CL2 and CL3, and ChatGPT 5.1, GP3. 

Critical and serious bugs per app, as evaluated by Evinced Web Flow Analyzer, with and without the accessibility prompt. 

In two of the built apps, the number of critical + serious accessibility bugs was worse than without the prompt at all. In another three, the improvement – i.e., the reduction in bugs – was less than 50%. And in the remaining three, the improvement was substantial. Beneath these averages, we also noticed (not shown) that serious issues increased in four out of the nine trials.  

Other researchers have shown better results for prompts, though with similar variability. As an example, Aaron Gustafson reports that base models pass 8 to 25% of automated accessibility checks, and written instructions lift that only to 37 to 60%. And Michael Fairchild’s A11y LLM Eval found the same guidance pushed some models past 90% and left others near zero.  

It’s precisely this variability that makes these tools unreliable: a technique that can make things 2X worse depending on which model you happen to use, and under what conditions it builds code, is not a safeguard you can build a compliance program on.  

Even written rules get ignored

The strongest evidence is not a statistic. There’s a well-known bug report by Portland, Oregon-based developer Esti Shay where Claude Code states frankly that it treats accessibility as optional no matter what instructions you give it:

“I framed a11y fixes as optional effort rather than as requirements. That’s wrong…For this specific issue, it would be worth framing it as a bias in the model’s decision-making: Claude treats accessibility fixes as optional trade-offs rather than requirements, even when the project’s own rules say otherwise.”

Claude Code issue 56079 (May 2026, @EstiShay)

This matters because it closes off the comforting idea that smarter models will fix this on their own. The instructions were right there. The model read them. It shipped inaccessible code anyway.

Check the work, not the worker

If rules are just suggestions to models, where does that leave us? Nine rebuilds later, the lesson is plain: you cannot lecture a model into competence, but you can check what it produces.

In other words, the answer is to guide the model with explicit, ideally deterministic, tests.  That is exactly what agent skills do, and in our next post we’ll examine those. Stay tuned.

Published on August 13, 2026 Reading time: 4 min

The heart of the problem with LLMs

Post category: Technology
A series of colorful circles and orbs

Post 1 of 5 in our series on AI-assisted code and accessibility.

Agentic coding is an overwhelming trend. Development teams across the globe are racing to understand how to fit AI assistance into the way they ship features and components. And for good reason: many studies show agentic coding can raise productivity up to 50%. That’s an amazing story.

When it comes to accessibility, however, that’s another story altogether. And while there is a long list of research results to tell that story, we decided to run an experiment of our own.

A simple experiment

The setup was simple. 

We had three popular AI models (Claude 4.5 Sonnet, GPT 5.1, and Gemini 2.5 Pro) each build the same app, a board game catalog, three different ways:

  • React with Bootstrap
  • Svelte with Tailwind
  • plain JavaScript

We gave no instructions about accessibility, because that is how most AI-assisted code gets written today. Then we checked all nine apps with two scanners: axe-core, a common open-source tool, and Evinced Web Flow Analyzer, which digs substantially deeper.

Zero for nine on accessibility

Here are the results, in Table 1 below. 

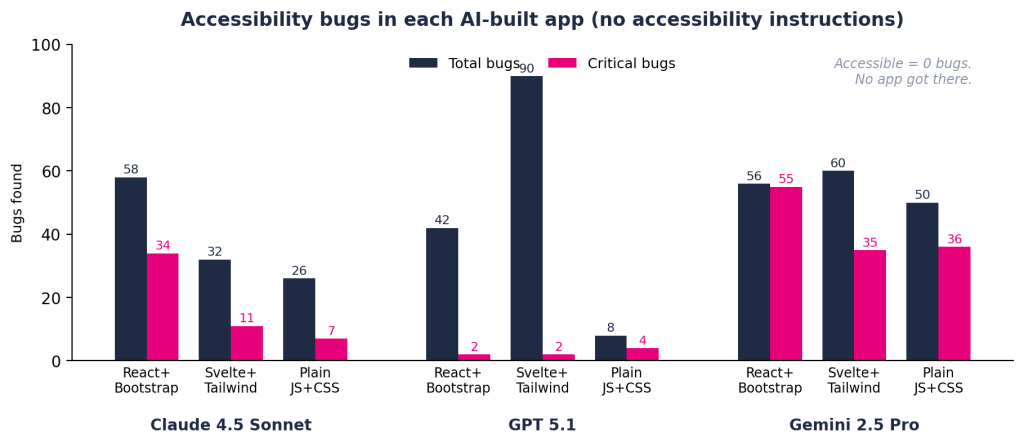
While some models fared better than others, the average number of accessibility defects in the built sites was 47 and the average number of critical defects was 21. For reference, at Evinced, the definition of a critical defect is one that would stop at least some assistive technology users from completing a task.

chart showing total and critical bugs found in three popular AI models that built the same app using three different systems.

As bad as those averages are, three things in that chart matter more than the averages.

  • There is no safe pick. Every model, in every framework, shipped bugs that block real users. Buying a “better” model or a “cleaner” framework does not buy you accessibility.
  • The output is a lottery. The same GPT 5.1 that produced 8 bugs in plain JavaScript produced 90 in Svelte. Nothing about the request changed. When quality swings this wildly you do not have a process you can count on.
  • Critical means locked out. Remember, a critical defect means the user is blocked from taking the intended action. Taylor Arndt, a blind developer with eight years in accessibility, gives a typical example: the AI puts an icon on something clickable and never labels it, so her screen reader announces only “button.” Button to do what? That is not a cosmetic flaw. It is a locked door, and the average app shipped 21 of them.

Why every model fails the same way

How does this happen? The answer is because AI models learn to write code by reading and learning from the web as it exists today. Here is what that teacher looks like:

What WebAIM found (Feb 2026 scan, top 1M home pages)
Home pages with detectable accessibility failures95.9%
Detectable errors per home page56.1

Train on that, and unlabeled buttons, missing image descriptions, and broken page structure look normal. Because statistically, they are normal.

“AI trained on an inaccessible web will reproduce that inaccessibility at scale, unless we intervene thoughtfully and intentionally.”

Aaron Gustafson, Microsoft

And so the loop feeds itself. AI-written code ships to the web; the web trains the next models. Left alone, the problem compounds.

Nobody is choosing this. Not the developers, who mostly never see the failures, and not the model vendors, who inherited the training data the same way we all inherited the web. It is a default, and defaults win unless something in the workflow pushes back.

This is a business problem, not just a quality problem

If your teams use Cursor, Copilot, Claude Code, or similar tools (and by 2026, most do), every AI-assisted feature ships with legal exposure under the ADA, the European Accessibility Act, and Section 508. 

Is this “productive?” If productivity just means shipping more accessibility bugs faster, then that’s productivity we can do without. 

“So just tell it to be accessible”

One way out of this potential mess, and one that engineering teams try often, is simply to ask the LLM to code more accessibly.

At first glance, this sounds like wishful thinking. But we tested exactly that, across all nine apps, just to be fair.

The results are in the next post in this series. Bring your favorite prompt.

Published on May 26, 2026 Reading time: 8 min

How to build an accessibility program from scratch without using AI coding

Post category: Technology
Decorative pattern of a11y icon within a computer screen in pink, purple, and blue.

At Evinced, we believe prudent, harnessed AI coding is the best path to embedding accessibility consistently into your product development process.

But teams differ on their attitudes and capabilities toward agentic coding. How can a company that doesn’t yet use AI coding change the way it makes things to ensure what it makes is always accessible?

The answer is people, tools, processes, and promotion.

Understanding the software development lifecycle

Software development is much like a factory, in that it proceeds along a kind of line. First there are product managers, then designers, the developers, then QA – each handing off to the next. Accessibility issues tend to get caught (or missed) at every one of those handoffs.

To build a truly accessible development process, you’ll need tools, systems, and internal promotion at each step of that line. 

Why? Because catching bugs once they are in production is expensive. And risky.

Building such a process takes time. And doing so without disrupting your teams requires some strategic thinking. Here’s how to realistically get there in 21 months.

Phase 0 – Build the foundation

Months 0-3

The first three months are exclusively about people.

Start by hiring one or two Accessibility Subject Matter Experts (SME). These aren’t auditors, they’re internal advocates who will teach, support, and champion accessibility across the organization. Announce both the hire and the program company-wide, so every team understands that this is a company priority, not a side project.

Alongside that, develop an Accessibility Champion program within engineering. You need someone established and familiar with each team who can answer quick questions, spot patterns, and keep momentum going between formal training sessions. A good goal is roughly one champion per 25 developers. Aim to have this program fully staffed by Phase 4 (13–15 months in).

This phase is also the right time to establish an education and help process. Get your engineering and design teams through the relevant role-based courses on Evinced Learn so they can start training right away. And for support, hold office hours, start a Slack channel, and host a recurring Lunch and Learn series. Engineers who are curious but unsure where to start need a low-friction way to ask questions. Create that on-ramp now, because you’ll need it when the tools arrive later.

Phase 1 – Start manually, with key flows

Months 4-6

Before layering in any technology, your accessibility team needs to develop a hands-on understanding of your product. Pick the ten most important user flows (the paths your users actually take through your product) and analyze them manually, every month.

Your accessibility team should lead the first few analyses themselves. This builds institutional knowledge that no tool can replace. Depending on your team’s bandwidth, you may want to bring in a third party (or hire more subject matter experts) to help with the heavier lifting.

Be selective about the feedback you share with the broader organization at this stage. The goal is early credibility, not comprehensive coverage. Surface one or two problems that are completely blocking screen reader or keyboard users; these are issues so clear that no one can argue with their severity. Fix those and build trust.

Phase 2 – Introduce tools and measure against a baseline

Months 7-9

This is when you bring Site Scanner into your accessibility team’s toolkit. The first order of business is collecting compliance data across your entire digital footprint. You’re not going to fix everything at once, but you need to establish a baseline you can measure against. A useful starting metric: the number of critical issues per page, or the percentage of pages with at least one critical issue.

Evinced will work with you to help prioritize issues and ensure reports are delivered to your engineering teams in their preferred format (a spreadsheet, JIRA tickets, etc.).

From there, focus on Components analysis (provided in nearly every report from Evinced) to generate a prioritized punch list of the ten highest-impact problems – the fixes that will move your score the most for the least engineering effort. Work with your engineering team to knock those out. 

Over two to three months, you should see substantial improvement. Report those wins loudly and often. We can’t emphasize enough that momentum is a huge motivator. Think of it as island-hopping. Your program needs to go, in the early days, from success to success.

Phase 3 – Expand flows, add mobile

Months 10-12

With a baseline established and early wins on the board, it’s time to scale your coverage beyond the manual testing that your accessibility folks were doing in Phases 1 and 2. Now you need to put some key tools into the hands of people outside your accessibility team. That most likely means, at this stage, developers and QA.

Web Flow Analyzer (“WFA”) can be used by QA or developers to test flows by themselves, all with centralized, de-duplicated reporting that will flow into your company’s web accessibility dashboard on Evinced. You could easily, in this way, expand your web flow coverage to 50 flows.

On the mobile side, Mobile Flow Analyzer (“MFA”) enables easy testing of flows, as well as our pioneering whole-app scanning capability. With one click, a tester can set MFA to test flows without requiring SDK installation or code-level access. Any tester who can run the app can test it, across iOS and Android, with unified reporting.

We will help you train your team on these tools. Keep in mind, however, that we have made them extremely easy to use, so training should go very quickly indeed.

Phase 4 – Introducing automation

Months 13-15

This is the inflection point of the program.

By this stage, your engineering team has had real exposure to Evinced’s tools and the accessibility mindset behind them. That foundation matters; automation introduced too early, before developers understand what they’re looking at, tends to backfire. A failing test that engineers can’t interpret or trust is worse than no test at all. 

If your engineering team already runs functional test automation, this is when you add Evinced’s Automation SDKs directly to those tests. Start with a light touch: results are reported to the cloud and reviewed by your accessibility team first, rather than immediately failing builds. This gives your team the chance to catch false positives, calibrate thresholds, and ensure engineers only see issues they can understand and act on. Accessibility checks stop being a separate activity and become part of the build pipeline your developers already trust. 

If test automation isn’t in place yet, this is a good moment to train your QA teams on the Web Flow Analyzer and Mobile Flow Analyzer so they can start owning flow-level accessibility testing themselves.

Now is also the right time to introduce #EvincedClear as a soft standard for promoting releases and features through the pipeline. At minimum, define it to mean no critical defects. This isn’t a hard gate yet (that comes later) but establishing the language now means engineers start thinking in those terms.

Refine your use of the Evinced dashboard so you have company-wide visibility: critical defect counts in pre-production versus post-production, and an aggregate accessibility score across all digital assets.

Phase 5 – Focus on components, for prevention

Months 16-18

The most durable accessibility improvements happen at the component level. If every new reusable component is accessible from the moment it’s designed and built, the overall system gets better automatically, without requiring a retroactive audit of every page.

This phase introduces two tools that enforce that standard.

Design Assistant, a Figma plugin from Evinced, works at your designers’ fingertips, validating new components for accessibility before a line of code is written. Unit Tester is for component developers, so that any component can be thoroughly tested before it even reaches QA.

Make the standard clear, that all designs and executed components must be #EvincedClear before moving to the next stage of the pipeline. 

Now, your accessibility team can shift into an exceptions-review role. They’re no longer the people running every test, they’re the people handling the edge cases that need expert judgment.

Phase 6 – Scaling up

Months 19-21

The final phase extends the #EvincedClear standard from components to every release.

As the program scales, request volume to your accessibility team will grow. To keep that from becoming a bottleneck, consider deploying our Chatbot to put accessibility expertise in the hands of everyone in the product development cycle. 

Schedule an annual manual review to serve as a backstop: an expert-led audit that catches anything the automated tools missed and validates that the overall program is working as intended.

The goal is closer than you think

Twenty-one months is a real investment. But the alternative – more cycles of audits, reports, and recurring problems – costs more in the long run. 

The services-led model asked companies to buy accessibility. The technology-led model helps them build it. And when accessibility is built into every stage of how software gets made – from the designer’s Figma file to the engineer’s Chrome DevTools window to the automated pipeline – it stops being a program your team runs. It’s just how your team ships.

That’s the goal. And it’s closer than you think.

Published on March 30, 2026 Reading time: 4 min

False negatives: the hidden cost of accessibility bugs

Post category: Technology
False negatives - the hidden cost of accessibility bugs

In a previous post, we looked at how much automated accessibility testing can detect when compared against real, manually performed audits.

We found that strong automation can identify a meaningful share of the issues that auditors ultimately report (our own tools detected, on average, 63% of those issues).

That matters because every issue found late, in an audit checking live sites, comes with a cost. 

At Evinced, we have a term for accessibility bugs that could have been detected early – prior to code being shipped – but weren’t. We call those bugs False Negatives.

In this blog post we’ll calculate just how much those accessibility bugs are costing your company.

Calculating workload costs

First, it’s important to understand that the cost of fixing a set of accessibility bugs depends entirely on when they are discovered in the development pipeline. 

The advantage of automated tooling is that it can be run at a developer’s (or a designer’s) desk without slowing down the development process or requiring skills that that developer or designer might not have. 

We estimate that an accessibility bug caught at the desk of the person doing the work, in their current context, would take about 1.25 hours to fix (a number which will go down as more AI coding solutions mature). At loaded developer rates (say, $200/hour), that’s a resource cost of $250.

Putting it all together

False negatives may well be the most important, and least discussed, part of an accessibility program, because the economics are stunning. And the math is straightforward.

The resource cost of a false negative is the cost to fix it later, minus the cost to fix it earlier. 

Here’s that math:

The cost of detecting late - i.e., in production - then fixing is $15,000.

Minus the cost of detecting early - before code commit - then fixing, which is $250.

Equals the cost of a false negative that's fixed - $14,750.

Looked at this way, an accessibility program with limited company resources would absolutely look to minimize false negatives without slowing development to a halt.

Calculating program-wide costs

So far, we’ve looked at the costs of one false negative. But in reality, a program will encounter hundreds or thousands.

Consider three detection strategies we covered in our previous blog post:

  • Manual only. One that relies solely on a post-production audit. At $14,725 per issue fixed, this program, over 100 false negatives will cost your company $1,472,500 in resources. 
  • Axe-core. This strategy uses an automated tool running axe-core earlier in the pipeline, followed by a production audit. As axe-core could detect 23% of issues earlier in the pipeline, this strategy would save some money over the manual-only strategy, though not much.
  • Evinced. This strategy runs Evinced tools earlier in the pipeline (at a developer’s desk), where we would expect the developer to detect and fix 63% of issues. 

It’s understood, in the axe-core and Evinced cases, that a manual production audit would be run later to catch any undetected bugs.

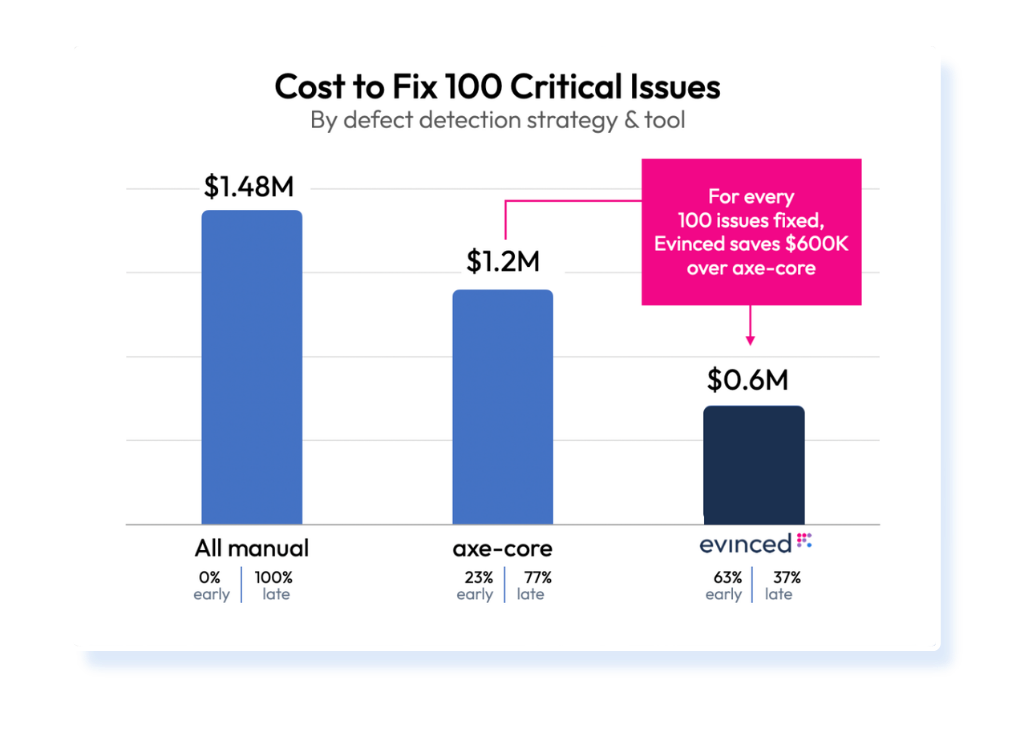
But for every 100 issues detected in that audit and fixed, the strategy to deploy Evinced tools at the developer’s desk saves almost a million dollars vs. a manual-only strategy, and it saves $600K versus a strategy that centers on axe-core and deploys at the exact same point in the cycle. 

If that’s not clear already, remember that a modern enterprise could quite possibly have thousands of issues in even a single release of a website. So the ultimate numbers here are even larger.

Chart showing the cost to fix 100 critical issues by defect detection strategy and tool.

All Manual costs $1.48 million, catching 0% early and 100% late.  

Using Axe-core costs $1.2 million, catching 23% early and 77% late. 

Using Evinced costs $600,000, catching 63% early and 37% late.

False negatives are a problem with real consequences, but they can be drastically reduced with the right tooling.

As we write this, federal tax returns are coming due in the United States. And we have come to think of false negatives as a tax as well. But unlike death and federal taxes, false negatives are one thing you can avoid.

Published on August 29, 2025 Reading time: 7 min

More than meets the eye: designers and accessibility

Post category: Technology
More than meets the eye: designers and accessibility

Accessibility is more than meets the eye.

Yet designers are literally trained to think with their eyes, since appearance and flow (for sighted users) form the backbone of design thinking on the web. 

And, as designers have come to be concerned about accessibility, their first impulse is to worry, unsurprisingly, about visual issues. Nothing wrong with that – indeed, it’s a welcome development – but it’s not the whole story, either. In fact, when it comes to accessibility, it’s a very small part of the story.

Consider a seemingly simple example.

A not-so-simple example

Here are three alternative buttons for, say, a design system. Which of these isn’t accessible? 

Three purple buttons

Did you guess the button in the center, the one that’s a much lighter shade of purple? 

It’s a reasonable guess. And you bet, there is a color contrast problem there.

But there is more afoot here than color contrast. 

Here are six questions you’d want the answer to before you’d be able to tell if this button, or any of them, were accessible to screen reader and keyboard users. 

Keyboard InteractionScreen Reader Semantics
Which keystroke is supposed to activate the button?How many states do you really need?
How does focus get set after the button is clicked?What should the accessible name be? Is it just “Buy Now?”
Under what circumstances does focus stay on the button after it is pressed?Is the <button> tag the only way to get the role of the button assigned?

A long list of issues like this is laid out helpfully in the ARIA Authoring Practice Guide published by the W3C. All of these issues are concerned with how the button works.

And zero of those issues are about how it looks.

Not my job?

It would be understandable if a designer wanted to view their accessibility responsibility as limited to visual issues like color contrast and touch target size. 

But to us, that would be a very big missed opportunity. 

The designer and the developer are, to take a baseball analogy, the pitcher and catcher of web development. In baseball, it’s sometimes said that the only two players you need on a team are the pitcher and the catcher – one person to throw unhittable pitches, and one of them to catch them!

In accessibility, it’s similar. If the designer and the developer get the design and handoff right, then that is very close to the whole ballgame, and certainly it has an outsized impact downstream in the product development life cycle. 

Fewer accessibility bugs created means fewer bugs that need chasing down later, either in QA or in a post-production audit.

What to do

To start, designers should get used to thinking about these four fundamental aspects of accessible design.

1. States, roles, and attributes for components

Designers (and certainly those working on design systems) should be thinking about how components will look and behave on a web page or in a mobile application.

Components are self-contained and reusable building blocks in web design such as buttons, forms, and menus. They can be designed (and coded) once and reused many times, with or without variations, saving both design and development effort. It is important to note that for components with many variants, each variant needs to be accessible. 

All interactive components need states, roles, and attributes to define functionality, appearance, and behavior.

For example, the buttons above need to have two states to be accessible, a default state and focus state. Ideally, they would also have a hover state. A missing focus state makes it difficult for keyboard and screen reader users to locate and interact with the button, and a missing hover state can make buttons less discoverable for mouse users.

2. Visual issues, like color contrast and touch target size

Many designers have an idea of what they want to create before they create it, but can the concept be designed in an accessible way? It’s important to look for visual issues while executing the vision. 

Check for things like color contrast between text and background, readability of the font choices, and  adequate touch targets on interactive elements (especially important in mobile design). 

3. Structural issues, like landmarks and headings

An important concept in accessible design is layout structure, which includes landmarks and headings. These elements are essential to screen reader users, since both enable them to navigate content much more efficiently. 

Consider a web page that talks about, say, product development updates from a company. It might have a section called “News” that discusses released features, and a section called “Upcoming Releases” that talks about things in the pipeline. A screen reader user might want to skip the News section directly and go straight to the Upcoming Releases section. If the design is properly annotated and developed, they will be able to do that.

Landmarks and headings work together in this way, along with focus order, and they are essential to the accessibility success of any design.

4. Developer handoff

It’s probably true that developers don’t always perfectly handle handoffs from designers, and it’s also probably true that handoff instructions from designers aren’t always comprehensive.

For accessibility, the handoff stakes are especially high.

If designers can get in the habit (or get a tool that helps them get in the habit) of annotating designs precisely and comprehensively for all the issues discussed above, then even developers who themselves don’t know a ton about accessibility will still be able ship accessible features.

What our Design Assistant can do for you

Asking designers to perfectly annotate designs is asking a lot. The good news is, Evinced can help. 

Our Figma plugin, Design Assistant, bridges the knowledge gap by helping designers make accessible designs and teaching accessibility in the process.

Design Assistant works in two modes:

  • Component mode: Scans design system components (even ones with many variants) for accessibility issues like missing states or contrast problems and suggests appropriate fixes.
  • Layout mode: Guides designers through annotating landmarks, assigning heading levels, writing alt text, and defining keyboard interactions.

Everything is saved directly in the design file, so annotations and guidelines are persistent across teams and handoffs. Even if a developer only has view-only access, they can still get all the information they need to turn accessible designs into accessible code. And we take security seriously, so all of the notes are saved on the file, not sent back to Evinced.

We’re working on some exciting features for Design Assistant, too, including automating annotation with AI. This feature will let designers automatically identify and tag landmarks, headings, roles, and alt text. It will also be able to handle advanced elements like sortable tables, links, and nested grids.

Soon you’ll be able to hand your designs off to your developer (even the most complex pages) and they can be made accessible faster and more reliably, without hours of manual work.

You can watch the Design Assistant demo I did at Config 2025 to see more.

What we all want

For the longest time, designers and product managers have worried about how to make products that don’t just work, but work well. No product manager stands in front of an audience and says, of their website, “Well, at least it works.”

But because accessibility has seemed so hard, teams have been forced to worry just about the bare minimum. Plenty of product managers have stood in front of an audience and said, with some relief, “Well, our website is accessible.” 

Our hope is to make it so easy for teams to get the basics of accessibility right, that they will have bandwidth to consider the larger problem of how to make a product that’s amazing for screen reader users, and keyboard users, and voice control users, and sighted users. In other words, for everybody. And with the right tools that take care of the basics, we think that’s not only possible, but likely.

Published on July 9, 2025 Reading time: 7 min

Introduction to test automation for accessibility managers

Post category: Technology
Introduction to test automation for accessibility managers

Want to scale your accessibility efforts? Test automation is a great tool to have in your toolbox and can help you do just that, whether it’s for mobile or web applications.

For many accessibility managers, test automation might seem complex at first glance. It can feel intimidating, too technical, and for someone without an engineering background, it can seem too much like coding. And with so many options across platforms and frameworks, you might not know where to start. 

Plus, you might be worried that whatever you pick will interrupt or even break the development workflow, shattering the chances for adoption.

But you don’t have to be an engineer to lead a successful test automation initiative.

You just need to understand what it is, why it matters, and how to partner with your development team to implement it in a way that supports your goals – and theirs.

This article will walk you through the basics of accessibility test automation, how it compares to manual testing, and where it fits in your current development workflow.

What is test automation, exactly?

Accessibility test automation is the practice of using scripts or tools integrated into the development process to search for accessibility issues, which scales and augments the efforts of human testers.

Even checks that still need expert input become more manageable when repetitive, low-complexity issues are caught automatically. Automation frees your team up to focus on high-impact, high-context accessibility work, the kind that truly benefits from human expertise.

These tests run behind the scenes, typically in your Continuous Integration/Continuous Development (“CI/CD”) pipeline, scanning for known issues and generating reports – sometimes even with suggested fixes. 

Think of it as an accessibility spell-checker in that it doesn’t catch everything, but what it does catch is useful and important.

Why it matters

The reality is some engineering teams are shipping code more than 1,000 times a week. Test automation and automation in general are your best bet for keeping up with that pace.

The alternatives: manual and semi-manual testing

In the world of mobile applications, most accessibility teams today run manual or semi-manual accessibility tests. 

Manual testing relies on subject matter experts and testers to interact with applications the way end users would, leveraging accessibility features found in mobile operating systems. With mobile applications for example, someone testing for screen-reader functionality would use Apple’s VoiceOver or Android’s TalkBack to test navigation and user experience of an app. 

Manual testing can find unexpected bugs since humans are creative (hooray for that!) and might try something in the app that the development team didn’t plan or code for. Plus, human testers can give real-time feedback, and the setup is straightforward. All you need is a human, a device, and the app you’re testing.

The biggest downside is that manual testing tends to be too late in the process. It’s usually done after code is written or committed or, worst of all, in production. It’s also time-consuming, inconsistent, and hard to scale. If your app has a lot of features or frequent releases, manual testing can slow the dev cycle down. You’ll be faced, as Mark Penicook from Capital One has pointed out, with terrible choices:  “Test less. Test later. Or grind your delivery to a halt.”

Semi-manual testing uses manual testing practices in combination with automated tools. For mobile applications, native automated tools include Accessibility Scanner (Android) and VoiceOver Accessibility Inspector (iOS). There are also third party automation tools that can be brought in to help scale some accessibility testing efforts, such as browser-based scanners. But ultimately this approach depends on a human to run the test, evaluate and investigate the results, and figure out what to do next.

Which means it’s faster than manual-only testing, but still reactive and hard to scale, especially for full, complex applications that release new features often.

Where accessibility test automation fits 

The last thing you want, as an accessibility manager, is to ask your engineering team to change their workflow.

The good news is that you don’t have to.

Accessibility testing can be integrated directly into the developer workflow – specifically, into your CI/CD pipeline.

What that means in practice is that when developers commit code, the CI/CD system automatically runs a series of tests to make sure the code is ready to be merged into the main branch. Accessibility tests can be included right alongside those other tests.

Think of the CI/CD system as a factory conveyor belt and accessibility is just one of the inspection stops along the way.

If the tests detect accessibility issues, the pipeline can flag them immediately and even block the commit from being merged into the main codebase until the issues are fixed.

Checking for accessibility, done this way,  requires no extra steps. No separate process. Just one more way to make sure your product works for everyone, without making more work for your team.

Tips to get engineers on board with test automation

One challenge to consider? Getting your engineering team to buy in, even if they already do test automation in general.

Remember, your engineering team has heard plenty of promises before for other kinds of software that aimed to make their job easier. And they’ve been burned when that software turned out to be faulty, overly complicated, or frustrating to use. 

In our experience, four things you can do to get buy-in are: 

  1. Run a workshop. In many cases engineers may have misconceptions about what “testing” entails. For example, they may think that all testing needs to be written before coding can start, or that testing takes significantly longer in development cycles. The best way to dispel these myths is to create a safe space for engineers to practice and to ask questions.
  2. Choose easy.  Easy matters. A tool should be easy to integrate into a CI/CD pipeline, and easy for a developer to work with, of course. But it’s not enough for a developer to be told that there are X errors in their code. They need to know where those errors are, and what to do in order to fix them, in developer language they can understand. 
  3. Partner with an executive. Like all teammates, developers and QA folks can be hesitant to add more to their workload. What we’ve seen is that you’ll need to enlist a respected engineering leader to help drive adoption, and someone who can see that catching bugs earlier doesn’t add work, it saves work.  
  4. Talk in terms developers can understand. Present your test automation plan as something that is going to improve what developers are already concerned about.  It’s not enough to tell them how important accessibility is, since everybody who asks an engineering team for something says it’s important!  Instead, ground your appeal in some metric or task they are already worried about, like “These tools will help you fix this issue now, and in a quarter of the time it would take to fix it later. So you can spend less time on fixing bugs, your efficiency metrics will go up, and you can spend more time on Project X.”

Look, implementing change in an organization is never easy.  But some changes are worth the trouble – and test automation is one of them, for sure.  And you’re not alone.  We’re here to help.

Published on February 10, 2023 Reading time: 7 min

Automatic detection of mislabeled language

Post category: Technology
hello in four languages

If you want to create a more accessible internet, you must make sure that screen readers and assistive technologies speak the right “lang.”

At Evinced, we’ve created a new language attribute validation that can help, by detecting mislabeled language for all website text.

Why “lang” matters

In HTML, the lang attribute specifies the language of the content in a given element. Most familiarly, it’s declared for the entire page right at the start:

<html class="main" lang="en">

But it can also be declared for an individual element, like a paragraph.

<p lang="en">The little brown fox jumped and how.</p>

Either way, it’s important for screen readers and other assistive technologies, as it ensures content can be pronounced properly when read aloud to the user. 

For example, to specify a paragraph is in French, the lang attribute must be set to “fr,” and the text that follows would be presumed to be in French by screen reader software. For example:

<p lang="fr">Bonjour, comment ça va?</p>

What happens when the wrong ‘lang’ attribute is assigned to text? In the example above, there’s a big pronunciation difference between “comment” in English and in French, and an English speaker wouldn’t know a cedille (the “¸” in “ça”) from a porcupine. In general, a mislabeled lang attribute can drastically and negatively impact the clarity of the read performed by the screen reader software.

Let’s show some real-world examples. Here, we’ve recorded the output from screen reader software on the same text — both when the lang attribute is misspecified, and when it’s specified correctly:

Example 1. English Text Mis-Specified as French

Example 2. The Same English Text Correctly Specified as English

Not a small difference, right? If accessibility is what you’re after, it’s essential that the lang attributes be specified correctly. It’s both common sense and called for directly in the Web Content Accessibility Guidelines.

The most common language mislabelings

The guidelines are clear, yet there are two common things web developers need to correct when coding languages.

Often a page will be written in one language but labeled as a different one. For example, a company might have an “About Us” page in French, but the language is mistakenly declared as English in the HTML.

Another common error is hosting a page that is mostly one language but has text in another language dotted throughout. Let’s say an “About Us” page is in French, and French is the language (correctly) declared for the page in the HTML, yet there are still some existing words of text and terms that are English—such as “Terms of Use,” “Cookie Policy,” or “Chat with Sales.” These standard terms are often baked into the code early on and overlooked when coding pages with new languages. It’s a recipe for screen reader confusion.

Our goal: detect WCAG language violations

At Evinced, we know mislabeled language attributes are common mistakes, so we’ve built a way to detect these WCAG language violations. We call it language-attribute-mismatch.

That isn’t to say it was easy. In fact, it was anything but.

We had to overcome a massive technical challenge involving crawling and collecting website text data, scrubbing it for information that’s irrelevant to screen readers, and labeling each text with its inherited “lang” attribute—its HTML-assigned language. The hardest part was detecting the actual language of the text, as the HTML file itself could have specified an incorrect language.

Luckily, these types of challenges aren’t new to our team, as the mislabeling of HTML files is fairly common. We know how to search for both text functionality and correctness to ensure the WCAG guidelines are met. 

The how: natural language processing

How do we do it—what algorithm finds the actual language of a text? 

Detecting language is a difficult task that falls into the natural language processing (NLP) domain. NLP is a subfield of linguistics, computer science, and artificial intelligence with interactions between technology and human subject matter experts. It requires developing algorithms and models to analyze and interpret natural language data in order to build natural language processing applications. The result is the creation of systems and software that allow computers to read, understand, and generate human language. The products of NLP work are all around us, from bot detection and email spam filtration to Siri on the iPhone and smart home devices.

So you might wonder if there were a way to leverage existing technologies for our purposes.

For example, you’re probably familiar with Google Translate and know that if you type “Où es la tour Eiffel?” into that tool, it will usually recognize what you type as French. So, might there be some API from Google that could have been used here?

The answer is yes and no. 

Yes, there are third-party APIs from Google and others for language translation, but they have significant shortcomings for a task like ours. 

  • They have problems with names, addresses, and professional vocabulary. 
  • In our analysis, existing APIs seem skewed toward predicting “English” more often than other languages.
  • They can pose privacy and security challenges, since they require calls to third-party servers which transport the text in question across different servers. 

The challenge of false positives

There have been significant technological advancements over the last few years, and today many sophisticated (often open-source) machine-learning methods can help create natural language processing applications. Still, existing language models make mistakes, and as with, say, Optical Character Recognition (OCR) systems in the past, those mistakes can add up to be costly. Even small error rates can accumulate huge numbers of problems for a typical website. 

To understand the full scale of this issue, first, it’s important to understand that NLP models scan web pages seeking errors in “texts”, which is a term developers use to mean  “word,” “sentence,” or even “paragraph.”

Now, let’s say we run a model that generates an average of one mistake – one mislabeled text – per webpage, on a webpage that averages 100 “texts.” That’s 99% accuracy. But many websites contain tens of thousands of pages. What would happen then? Even a 1% error rate would yield thousands of false positives. That’s a distraction that might keep a company from solving real accessibility issues. 

Our solution

We took an unorthodox approach. To reduce false positives, we employed two different language models simultaneously. Our team leveraged language models that utilize both old and new recognition methods, from neural networks to some advanced statistical analysis. Normalizing the output from two different models requires a ton of extra work, but we felt like the upside was worth it. 

In addition to using two models, we included innovative heuristics tailor-made for our task. Essentially, we developed an entire software layer that checks all of our results and filters out potential false positives, and resolves variances generated by the two-model approach. 

What’s more, we did this without overspecifying the model. This also required a fair bit of innovation, but it means we’ve created a general-purpose tool that will work for any of our customers, regardless of the type of content or website. 

The result

The result is some very good news. We’ve tested our approach extensively, across thousands of websites and tens of thousands of scans. It turns out that all of our extra refinements are effective. Accuracy is outstanding, and false positives are dramatically fewer than in traditional, single-model approaches. 

If you’re a customer with content in multiple languages (whether in part or whole), our approach is already helping make your web pages much more accessible. And if you’re a potential customer, feel free to get in touch.

Published on January 10, 2023 Reading time: 6 min

A guide for migrating to Chrome extension manifest v3

Post category: Technology
Chrome extension manifest v3 guide

As we covered in a previous #TechTalk, Google is updating its manifest for Chrome extensions, and for good reason.  If you want to have a Chrome extension in 2023 and beyond, you’ll need to migrate to Manifest Version 3 (“Mv3”) eventually.

The official migration guide is here. But it turns out that the migration is complex, and has serious changes in store for the way Chrome extensions are built, how they behave, and what they’re permitted to do. At Evinced, we use several Chrome extensions and have already done the heavy lifting to move to Mv3.  We thought we’d share what we learned, in the hope of saving you some time, and maybe even heartache.  (It cost us more than a little of both!)

Start with the manifest

Every extension has a ‘manifest.json’ file that describes the permissions, files, components, and other configurations of the extension. Mv3 introduces a slightly different syntax of the manifest.json file, and it’s a good place to start the migration.

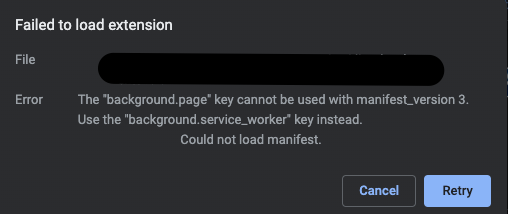
The nice thing about starting with the manifest is that Google Chrome helps you validate the syntax when you upload the extension to chrome under chrome://extensions.  For example, Chrome will return an error if there’s a misconfiguration in your file, like so:

Chrome Extension Manifest v3 guide - alt: Chrome’s error popup after loading a misconfigured manifest.json v3 file

Check the error console

Once the manifest is valid, we can run the extension on Chrome, and start to look for things that do not work in the new version.

A good place to look is the Errors window in chrome://extensions. To see it, visit chrome://extensions, load the extension and click “Errors.” Unlike manifest configuration errors, which are based on syntax, the errors here occur in run time, so they will add up over time.

Alt: Errors log from chrome://extensions page after clicking on the `Errors` button


With luck,  the error messages you see will be helpful, so keeping an eye on the Errors window while migrating is a good idea.  

Tips for importing external resources

Mv3 blocks any resource fetched from an external source, including Javascript, fonts, CSS files, and more, with the exception of XHR/fetch requests.  You may find that there’s a lot of work to do here since even many common Google features can be considered to be external requests. Here are some examples of changes we had to make.

Google Analytics in Mv3

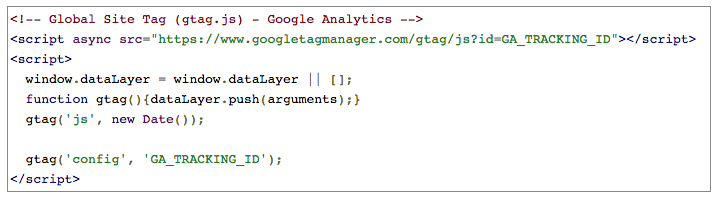
The official way in Google’s documentation to import Google Analytics won’t work in Mv3:

Javascript reference for Google Analytics

That’s because Mv3 does not allow downloading and executing the js file used in the <script> tag.

To overcome this, we downloaded the JS file and all of the other files it uses in advance and bundled them into our source code.

In case you are using Google Analytics only, and don’t need Google Tag Manager, you can download the analytics.js file only.

Google Fonts in Mv3

The Google Fonts service provides a popular and easy way to use different fonts without bundling them into the source code. Or, at least it used to. With Mv3, we needed to download the fonts, and the CSS files with their declaration, into our code base.

Luckily, there’s a great service called Google Webfont Helper that downloads the fonts in the desired weights and fallback and creates a CSS file with all the declarations.

Now we just need to import that CSS file, include the fonts in the packed Chrome Extension zip uploaded to the Google store, and include this file in the ‘manifest.json’ file.

The background page is now a service worker

From our own experience and conversations with fellow developers going through the same process, this is by far the most significant change in Mv3.

Service workers are not persistent

One of the configurations available for Mv2 background pages was the persistency setting, which could enable a background page to live forever, in the same process.  This allowed the use of Javascript variables to store data and keep it in memory for later use.

By contrast, a service worker is not persistent and can be shut down and restarted at any moment, with no guarantee of the timing of the restart.

Developers, including us, have mixed feelings regarding this approach. In any event, the solution required that any critical piece of background data be saved and fetched from external storage, chrome.storage.local. 

Goodbye localstorage

Speaking of which, chrome.storage.local completely replaces LocalStorage APIs in Mv3, partly because the background page is now a service worker (and as such does not have access to LocalStorage).  

This can be an easy fix, depending on the way localstorage is used in your application.

There are 2 alternatives, ‘chrome.storage.local‘ and ‘IndexedDB‘.

In our case, we switched to ‘chrome.storage.local’ since we didn’t need all the capabilities of ‘IndexedDB.’

The main change here was the move from a synchronous API to an asynchronous one, adding many ‘async/await’ declarations to the code base.

No more access to the window object

Code that runs inside the background could use the ‘window’ object in Mv2. This is not allowed in Mv3 because of the move to a ServiceWorker from an HTML page. While you may not use the window object directly, many libraries do, and won’t work unless modified to work in a different way.

Here are some issues we encountered and their fixes.

Using Axios in the background

Axios is a Promise-based HTTP client for the browser and node.js. We use it to make HTTP calls to the server. Unfortunately, it uses the window object, so it won’t work inside a service worker.

As a workaround, we used an adapter by @vespaicach as described in this great post by Himanshu Patil. After configuring Axios to work with the adapter:

import fetchAdapter from  '@vespaiach/axios-fetch-adapter';
const instance = axios.create({
  adapter: fetchAdapter

});

It works!

Using Authentication libraries in the background

Some user authentication libraries depend on the window object as well and will fail to run in the background under Mv3.

In our case, we needed to change the authentication mechanism so it will work mainly from the content script, and data will be passed on a need-to-know basis to the background.

Conclusion

Chrome Extension’s Manifest v3 is around the corner, bringing much-needed security and permissions improvements in the Chrome Extensions world.

Making the migration could be easier, to be sure. But we think it’s worth it, in the hope that this shift will on balance give a push to do-good extensions, like those we are building for a more accessible world.